Private cloud deployment
This article walks you through deploying Cequence AI Gateway to your private cloud Kubernetes clusters. You'll learn how to create pools from the UI and deploy the Operator to your cluster.
Overview
The deployment process consists of four main steps:
- Create a Pool - Configure your Kubernetes cluster settings through the UI
- Install the CLI - Download and set up the AI Gateway CLI tool
- Verify Cluster Permissions - Check and configure required RBAC permissions
- Deploy the Operator - Use the CLI to deploy the AI Gateway Operator to your cluster
Deployment Model
AI Gateway in your cluster is operator-managed and manifest-driven from the Cequence control plane — not a Helm chart you fork and maintain.
- What runs in your cluster: a small Operator that holds a one-way heartbeat connection to the control plane, plus the Armor data plane gateway and supporting components (Redis, ingress, SIEM exporter).
- Who decides what's deployed: the control plane. Pool configuration (resources, ingress, images, Redis mode, annotations) is set through the Private Cloud page in the portal. The Operator reconciles the cluster to match.
- Upgrades: continuous. New component versions are rolled out by the Operator based on the pool's rollout policy. You don't carry chart drift across versions or maintain a vendored fork.
- Inspection: every manifest the Operator would apply can be printed with
aigateway deploy install --dry-run --show-manifests. This is for security review and pre-flight inspection — it is not a supported fork-and-maintain path. Manifests change between Operator versions; pinning a snapshot will break upgrades.
The trade-off is intentional: less control over the manifest surface, in exchange for guaranteed-consistent upgrades and a much smaller artifact for your security team to review.
Mapping to your enterprise controls
| Customer constraint | How AI Gateway fits |
|---|---|
| Images must come from our internal artifact registry | Mirror our images and point the pool at your registry |
| Production-grade caching with backup/restore and your standard cache ops | Bring your own enterprise Redis (ElastiCache, Memorystore, Redis Enterprise, etc.) in Manual mode — recommended for all production deployments |
| CI/CD only; no interactive installers | Non-interactive deployment via environment variables and OAuth client credentials |
| Security review of cluster permissions before install | RBAC is namespace-scoped, split into bootstrap and steady-state; a single Role manifest is generated for pre-review |
Part 1: Creating a Pool from the UI
A pool represents a Kubernetes cluster where AI Gateway will be deployed. Pools define cluster-specific configurations like namespace, resource limits, ingress settings, and more.
Prerequisites
- Access to the Cequence AI Gateway UI with Tenant Admin or Tenant User role
- Basic understanding of Kubernetes concepts (namespaces, ingress, resources)
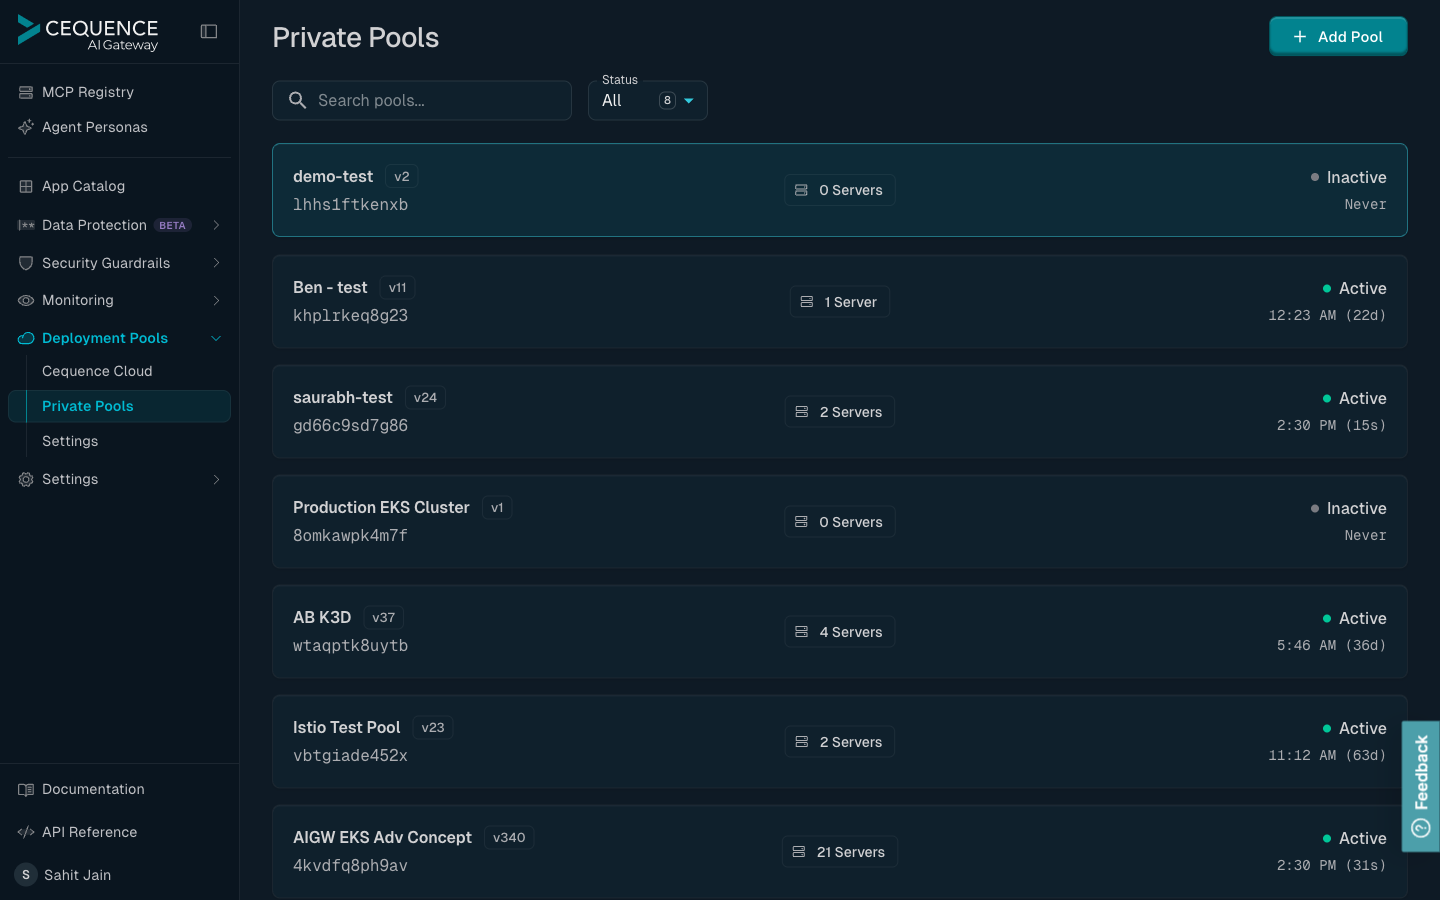
UI Overview: Private Pools Page
The Private Pools page (under Deployment Pools → Private Pools in the sidebar) is your central hub for managing pools.
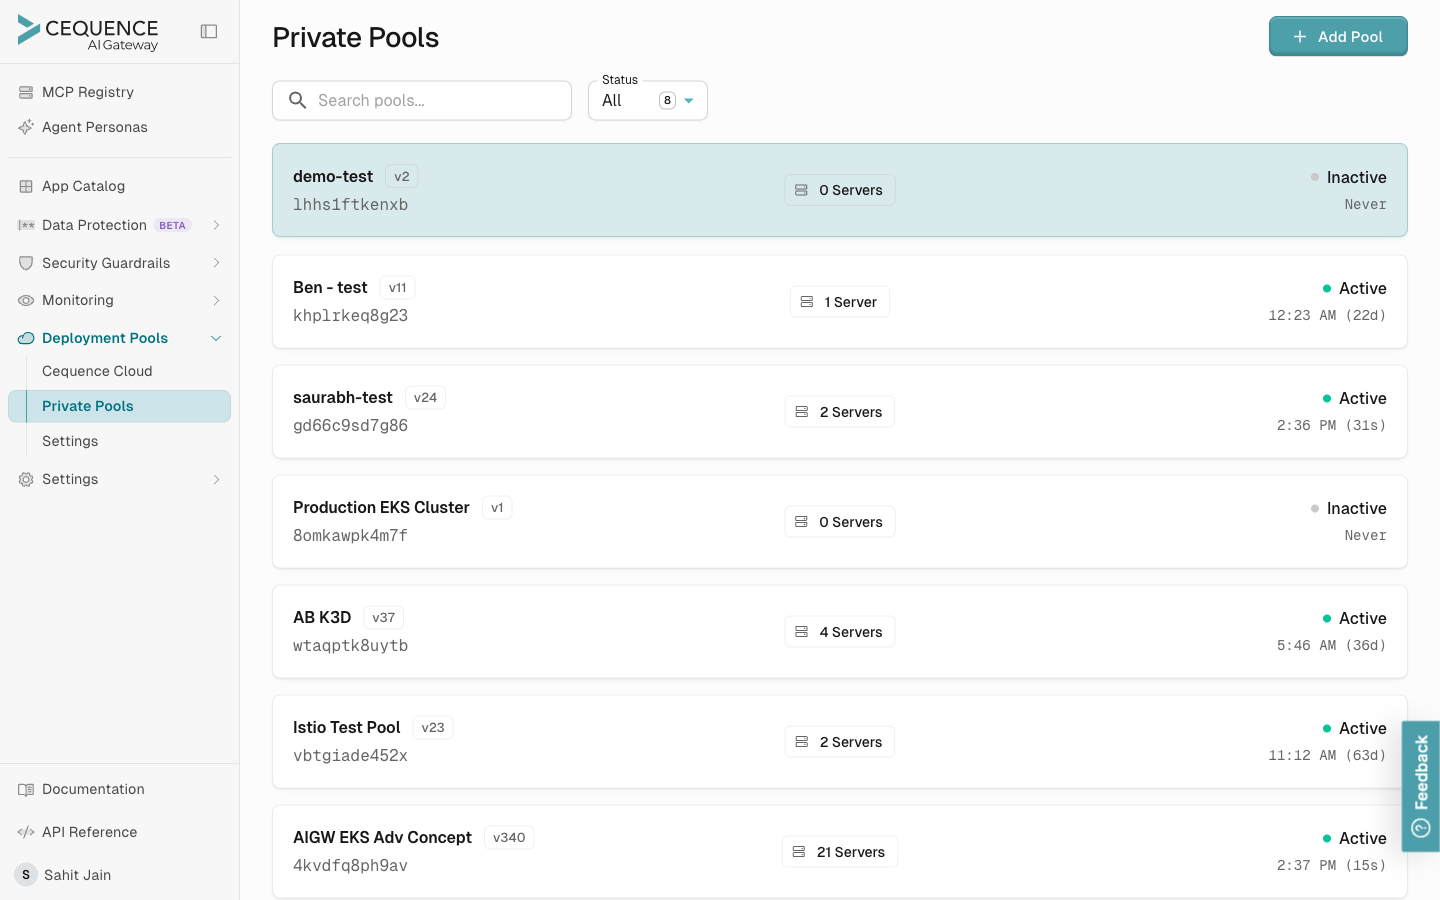
You'll see one of two states depending on whether the tenant has any pools:
Empty state (no pools created yet):
- Centered message: "No pools found"
- Instructional text: "Create your first pool to deploy MCP servers"
- An "Add Pool" button with a plus icon in the centre, mirrored by another in the top-right of the page
Pools list view (after creating pools, shown above):
- Header: search box, Status filter (All / Active / Inactive), and the Add Pool button
- Pool tiles: each tile shows the pool name, pool ID, current status, and a quick summary of deployed servers. Click a tile to open the pool detail page (see Pool detail page below).
Step-by-Step: Creating a Pool
The Create New Pool dialog only collects the essentials needed to bootstrap a pool. Ingress, endpoints, SIEM, and similar settings are configured on the pool detail page after creation — see Pool detail page.
-
Navigate to Private Pools
- Log in to the Cequence AI Gateway UI
- Expand Deployment Pools in the left sidebar and select Private Pools
-
Open the Create New Pool dialog
- Select the Add Pool button (top-right of the page, or the centred button if your pool list is empty)
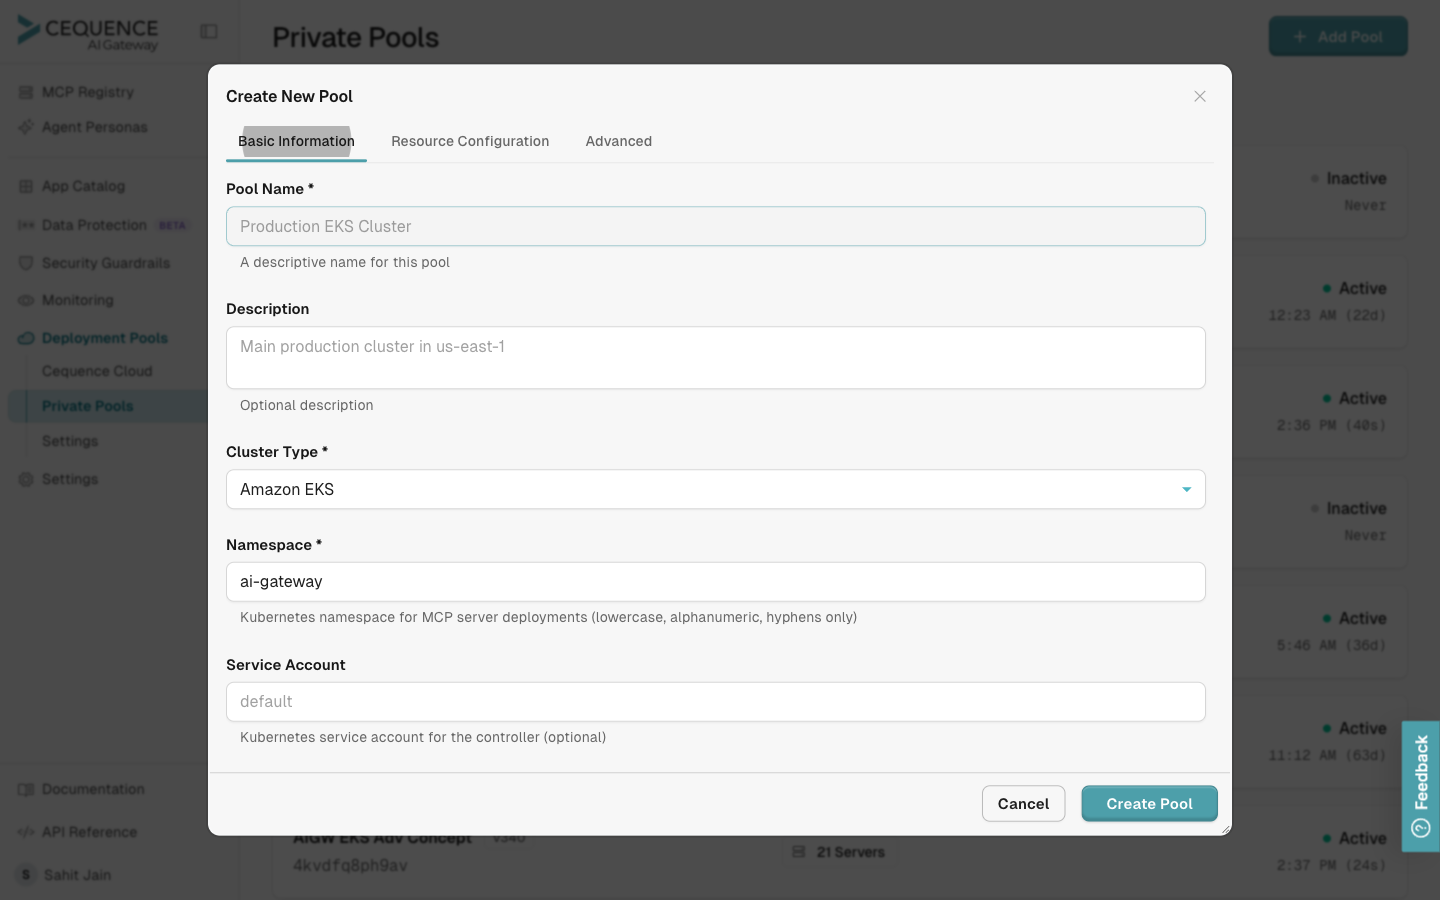
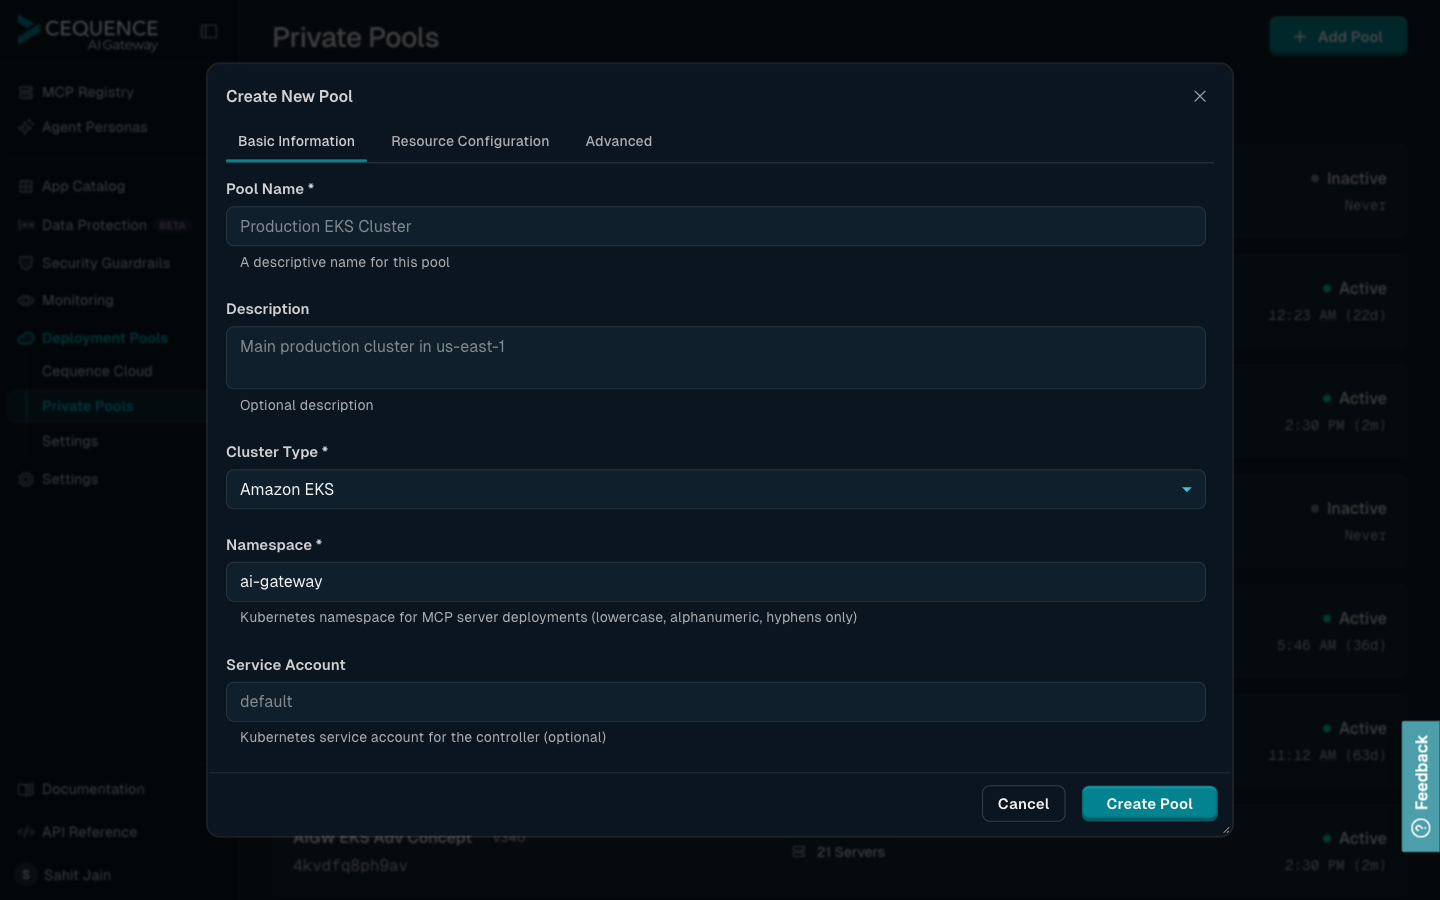
- The "Create New Pool" dialog opens with three tabs:
- Basic Information (selected by default)
- Resource Configuration
- Advanced
-
Configure Basic Information (Tab 1)
The "Basic Information" tab is selected by default when the dialog opens. Fill in the following fields:
UI reference: the Basic Information tab shows:
- Pool Name field (required) with helper text "A descriptive name for this pool"
- Description multi-line text area (optional) with helper text "Optional description"
- Cluster Type dropdown (required) with options: Amazon EKS, Azure AKS, Google GKE, Native Kubernetes
- Namespace field (required) with helper text "Kubernetes namespace for MCP server deployments (lowercase, alphanumeric, hyphens only)"
- Service Account field (optional) with helper text "Kubernetes service account for the controller (optional)" — set this to use a pool-provided ServiceAccount instead of having the CLI create one
Fill in the following required fields:
-
Pool Name (Required)
- Enter a descriptive name (for example, "Production EKS Cluster", "Dev GKE Cluster")
- Example:
production-eks-us-west-2
-
Description (Optional)
- Add a description for this pool
- Example:
Production cluster for US West region workloads
-
Cluster Type (Required)
- Select your Kubernetes cluster type from the dropdown:
- Amazon EKS - Amazon Elastic Kubernetes Service
- Azure AKS - Azure Kubernetes Service
- Google GKE - Google Kubernetes Engine
- Native Kubernetes - Standard Kubernetes cluster
- Select your Kubernetes cluster type from the dropdown:
-
Namespace (Required)
- Enter the Kubernetes namespace where MCP servers are deployed
- Default:
ai-gateway - Must be lowercase, alphanumeric, and hyphens only (max 63 characters)
- Example:
ai-gatewayormcp-servers
-
Service Account (Optional)
- Specify a Kubernetes service account for the Operator
- Leave empty to use the default service account
- Example:
aigateway-operator-sa
-
Configure Resource Configuration (Tab 2)
Set default resource limits for MCP server deployments:
-
Resource Requests
- CPU Requests: Minimum CPU allocation (for example,
100m,0.5,1)- Format: Numbers with optional 'm' suffix (millicores)
- Example:
100m(0.1 CPU cores)
- Memory Requests: Minimum memory allocation (for example,
128Mi,256Mi,1Gi)- Format: Numbers with unit suffix (Mi, Gi, M, G, Ki, K)
- Example:
128Mi(128 mebibytes)
- CPU Requests: Minimum CPU allocation (for example,
-
Resource Limits
- CPU Limits: Maximum CPU allocation (for example,
500m,1,2)- Example:
500m(0.5 CPU cores)
- Example:
- Memory Limits: Maximum memory allocation (for example,
512Mi,1Gi,2Gi)- Example:
512Mi(512 mebibytes)
- Example:
- CPU Limits: Maximum CPU allocation (for example,
-
Scaling Configuration
- Max Replicas: Maximum number of replicas per MCP deployment
- Range: 1-50
- Default:
5 - Example:
10for high-availability deployments
- Max Replicas: Maximum number of replicas per MCP deployment
Note: These are default values applied to all MCP servers deployed in this pool. Individual MCP servers can override these settings from the Edit Pool dialog under the "Resource Configuration" tab, which shows per-MCP resource overrides.
-
-
Configure Advanced Settings (Tab 3)
-
Redis Configuration
Production recommendation: bring your own enterprise-grade Redis (Amazon ElastiCache, Azure Cache for Redis, Google Memorystore, Redis Enterprise, or your platform team's managed HA Redis). Select Manual mode and provide its connection details. The bundled Auto-install Redis is HA-capable (3-node Sentinel), but production deployments should use external managed Redis for backup/restore tooling, observability, blast-radius isolation, and your standard cache operations.
Choose between two modes:
-
Manual (Recommended for production — bring your own enterprise Redis)
- Point AI Gateway at an existing Redis you already operate — Amazon ElastiCache, Azure Cache for Redis, Google Memorystore, Redis Enterprise, or your platform team's HA Redis fleet.
- Provide your own Redis connection details:
- Host: Redis server hostname or IP
- Example:
my-cache.abc123.use1.cache.amazonaws.comorredis.internal.company.com
- Example:
- Port: Redis server port
- Default:
6379
- Default:
- Username (Optional): Redis authentication username
- Password: Redis authentication password
- Database: Redis database number
- Default:
0
- Default:
- Enable TLS/SSL: Toggle TLS encryption for Redis connection
- Host: Redis server hostname or IP
-
Auto-install (Dev, POV, and self-contained installs)
- The Operator deploys a 3-node Redis Sentinel StatefulSet (1 master + 2 replicas with Sentinel sidecars) in the pool namespace, with persistent volumes, a PodDisruptionBudget, and an HPA. The topology is HA — failover is handled by Sentinel — but backup/restore, point-in-time recovery, cross-region replication, and cache-specific monitoring are not provided.
- Use for first-time setup, POVs, dev/test clusters, or installs that must be fully self-contained.
- For production, prefer Manual so that Redis is operated by your existing cache infrastructure and sits outside the pool's blast radius.
-
-
Image Configuration (Pool-level settings)
Configure custom container images for this pool. Leave any field empty to use the system default for that component. The most common use is pointing the pool at images you've mirrored into your internal registry.
- Operator Image: Container image path with tag for the Operator
- Format:
registry/repository/image:tag - Example:
your-registry.example.com/ai-gateway/operator:v10
- Format:
- Armor Image: Container image path with tag for the Armor data plane gateway
- Example:
your-registry.example.com/ai-gateway/armor:v12
- Example:
- Controller Image (Optional): Container image for the in-cluster controller component
- MCP Server Image (Optional): Default container image used when deploying MCP servers to this pool
- SIEM Manager Image (Optional): Container image for the SIEM log exporter
- Registry Credentials Secret Name: Name of the Kubernetes
dockerconfigjsonSecret in the pool's namespace that holds pull credentials for your registry. The Secret must already exist in the cluster before you runaigateway deploy install— the CLI references it by name but does not create it. See the mirroring walkthrough below for how to provision it.- Example:
regcred
- Example:
Note: These settings are stored at the pool level. Each pool can have different image configurations. If left empty, the system defaults are used. Override these only if you need to pull from a private registry or pin a specific version.
Mirroring images from your internal artifact registry
If your organization does not allow workloads to pull images from external registries, mirror the entire Cequence release path into your internal artifact registry (JFrog Artifactory, AWS ECR, Azure Container Registry, Google Artifact Registry, Harbor, Nexus, etc.) and point the pool at your registry. This is the standard pattern for regulated customers.
Why mirror the whole path instead of individual images. A path-level mirror means you don't have to coordinate a list of image names/digests with your account team every release. On upgrades you just re-sync the path — new tags appear in your registry automatically — and then switch the pool's image references to the new tag from this same Advanced tab. Your platform team's existing mirroring tooling (Artifactory remote repos, Harbor proxy projects, ECR pull-through cache, JFrog replication, Skopeo sync jobs, etc.) is designed to do exactly this.
One-time setup:
-
Get the release path. Ask your Cequence account team for the source registry hostname and the path that contains all AI Gateway release images (Operator, Armor, SIEM Manager, and supporting components). This is one path, not a list of images.
-
Mirror the path to your registry using your platform team's normal tooling — for example, an Artifactory remote Docker repository, a Harbor proxy project, an AWS ECR pull-through cache rule, or a scheduled Skopeo/
cranesync (skopeo sync --src docker --dest docker <source-path> your-registry.example.com/<dest-path>). Mirror by tag and digest so both work for downstream consumers. -
Create the image-pull secret in the pool namespace.
kubectl create secret docker-registry regcred \
  --docker-server=your-registry.example.com \
  --docker-username=<svc-account> \
  --docker-password=<svc-token> \
  --namespace=<pool-namespace>
You can also provision this secret through your platform team's normal secrets workflow (External Secrets Operator, Vault, cloud secret manager, etc.) — the Operator just reads it by name from the namespace.
-
Point the pool at your registry by filling in the image fields above (Operator Image, Armor Image, SIEM Manager Image) with your mirrored paths and setting Registry Credentials Secret Name to the secret you created.
-
Install or upgrade. The Operator pulls every image from your registry. The control plane never instructs your cluster to pull from the source registry.
Upgrade workflow. When a new AI Gateway version is released:
- Re-sync the mirrored path — your existing sync pulls in the new tags automatically; no new image list from Cequence required.
- Edit the pool's image tags in this Advanced tab to point at the new tag.
- The Operator rolls out the new versions on its next reconcile.
You stay in control of when new images land in your registry and when they reach production.
- Operator Image: Container image path with tag for the Operator
-
Pool Annotations (Optional)
Add custom Kubernetes annotations applied to all MCP deployments in this pool:
- Common annotations:
app.kubernetes.io/managed-by: ai-gateway-operatorenvironment: productionteam: platform
- Select Add to add each annotation key-value pair
- Common annotations:
-
-
Create the Pool
- Review all configurations across all tabs
- Select Create Pool button
- The pool is created and appears in your Private Cloud pools list
UI Reference: After creating a pool, you'll be returned to the Private Cloud page where your new pool appears in the list. The pool entry shows:
- Pool name and version (for example,
your-pool-name v1) - Unique pool ID (short identifier like "abc123xyz")
- Number of servers deployed (initially 0)
- Status (Active/Inactive)
- Last active timestamp (shows "Never" for newly created pools)
You can filter pools by status using the Status dropdown at the top of the page.
Pool Configuration Summary
Here's a complete example configuration:
Basic Information:
- Name:
production-eks-us-west-2 - Description:
Production cluster for US West region workloads - Cluster Type:
Amazon EKS - Namespace:
ai-gateway - Service Account:
aigateway-operator-sa(optional)
Resource Configuration:
- CPU Requests:
100m - Memory Requests:
128Mi - CPU Limits:
500m - Memory Limits:
512Mi - Max Replicas:
5
Advanced Configuration:
- Redis Mode:
Manual(production — point at your enterprise/managed Redis) orAuto-install(in-cluster Sentinel HA, for dev/POV/self-contained installs) - Operator Image: Leave empty for default (or set your mirrored registry path)
- Armor Image: Leave empty for default (or set your mirrored registry path)
- SIEM Manager Image: Leave empty for default (optional)
Pool detail page
After you create a pool you're taken to its detail page at /private-cloud/<pool-id>. This is where the rest of pool configuration lives — ingress, endpoints, SIEM, and per-component settings — and where you'll come back to manage the pool over time.
Pool Configuration Pending banner
A freshly created pool starts in a pending state until the Operator has been deployed to the cluster. The page shows a Pool Configuration Pending banner with a one-line aigateway init command pre-filled with your tenant ID, pool ID, and namespace. Click Copy Command, paste it into your terminal, and continue with the install in Part 2: Installing the CLI.
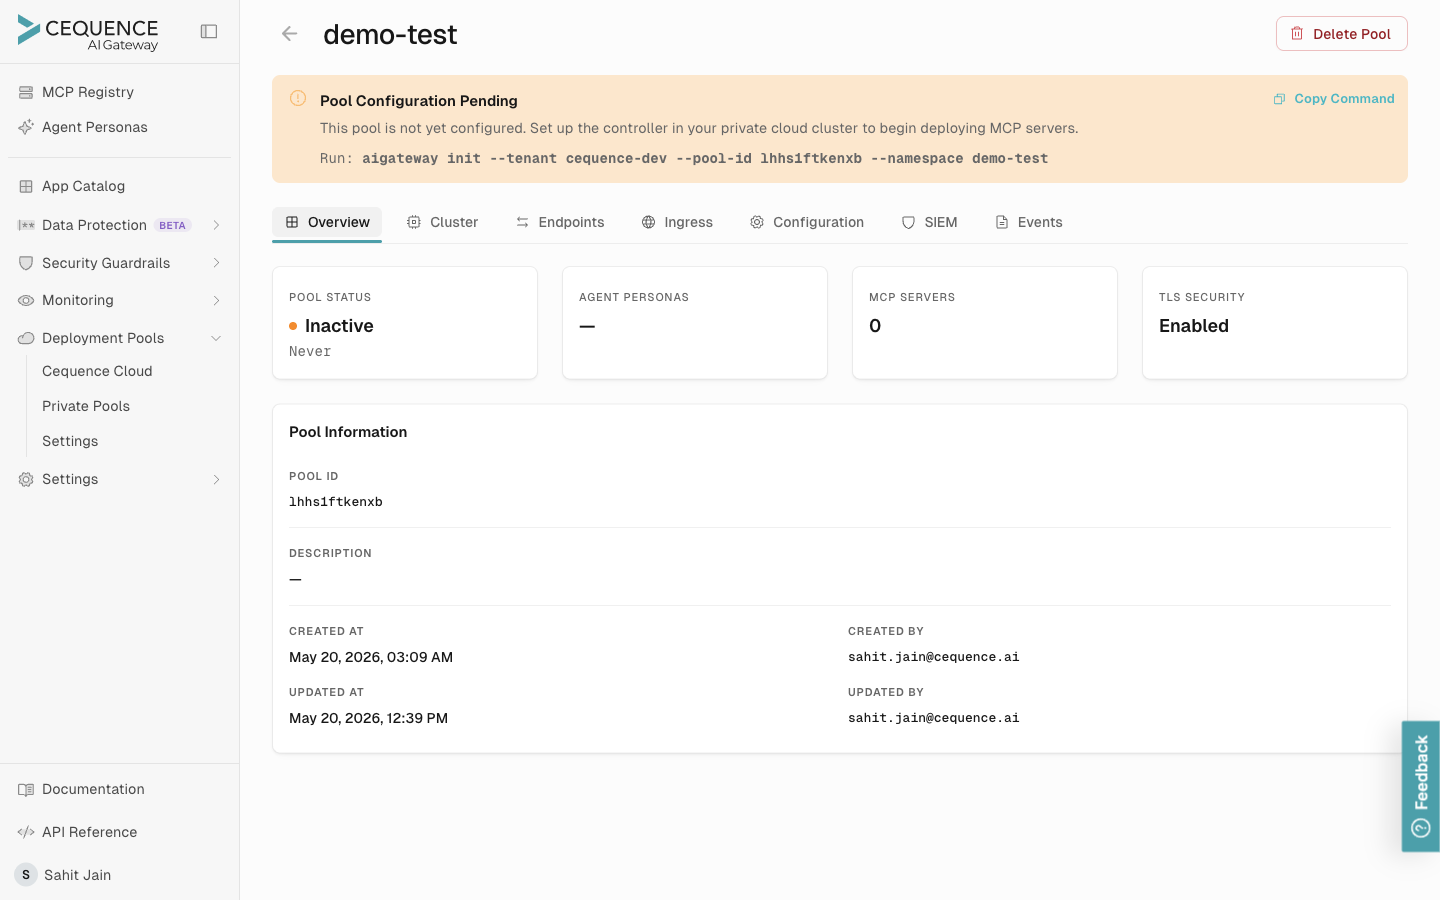

The banner disappears once the Operator connects and the pool transitions to Active.
Pool detail tabs
The pool detail page has the following tabs:
| Tab | What you configure here |
|---|---|
| Overview | Status, heartbeat, version, summary of deployed components |
| Cluster | Cluster-scoped settings (namespace, service account, cluster type) |
| Endpoints | The MCP endpoint hostnames Armor exposes |
| Ingress | Ingress provider(s) — see below |
| Configuration | Pool-level resource limits, image overrides, Redis mode |
| SIEM | SIEM exporter integration |
| Events | Recent operator events and pool activity |
Ingress tab
The Ingress tab is where you configure how MCP servers are exposed externally. Pools support multiple ingress providers, and you can enable more than one per pool.
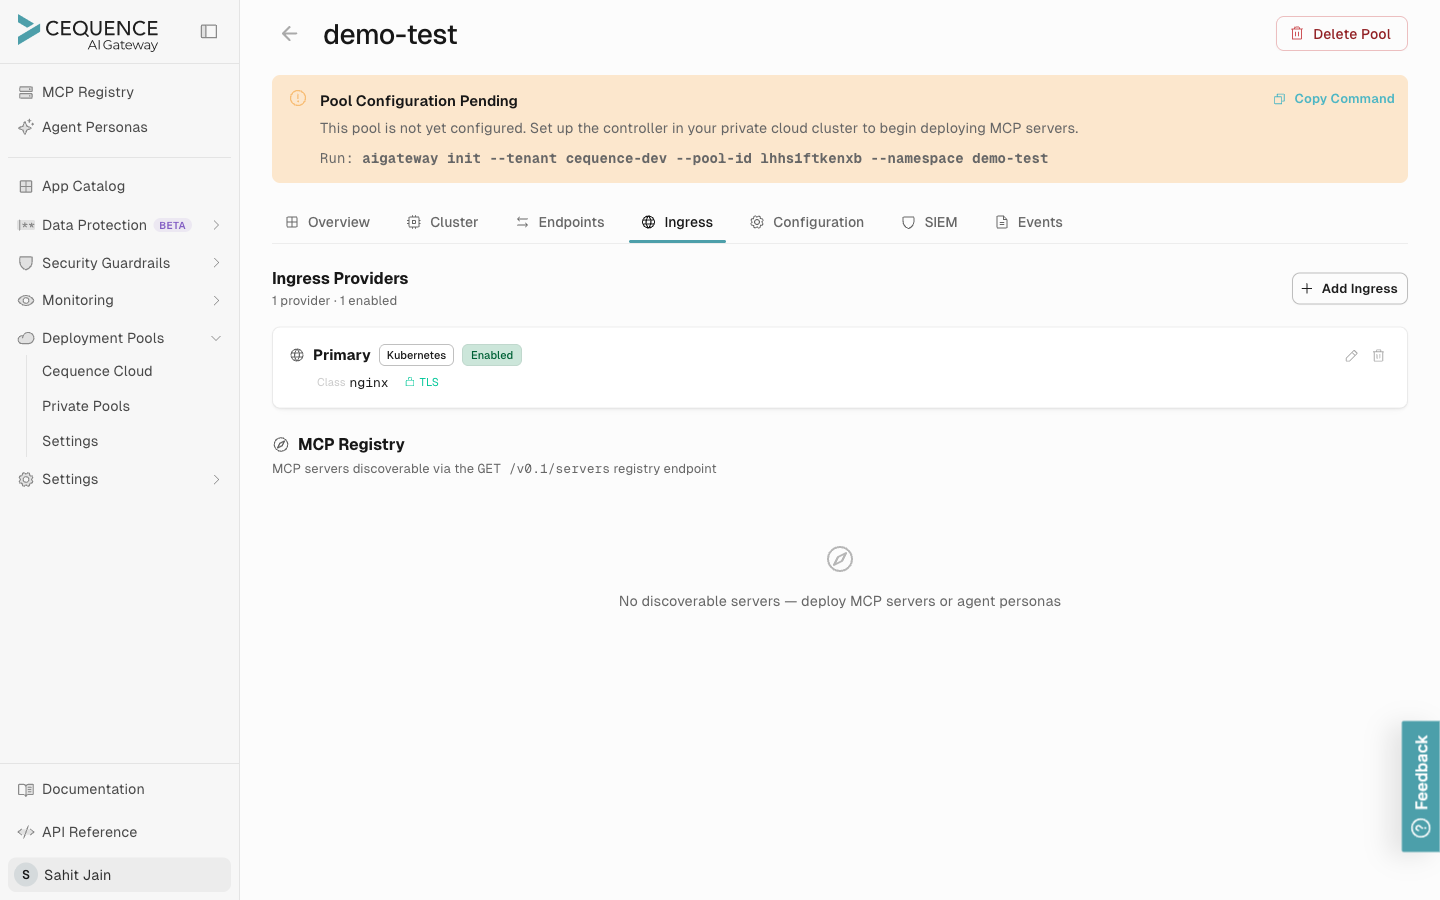
Each ingress provider entry shows its type (Kubernetes Ingress, Istio, Traefik, OpenShift route, Gateway API), its class or controller, and whether TLS is enabled. Use Add Ingress to register a new provider, and the per-row Edit / Delete actions to manage existing ones.
Supported ingress provider types include:
- Kubernetes Ingress — works with any standards-compliant controller (NGINX, AWS ALB, Azure Application Gateway, GKE Ingress, HAProxy, Kong, Contour, Ambassador, etc.). Configure host, ingress class name, TLS, and provider-specific annotations.
- Istio Gateway — for clusters running the Istio service mesh; configures Gateway + VirtualService resources.
- Traefik IngressRoute — for clusters using Traefik directly.
- Kubernetes Gateway API — for clusters using the upstream Gateway API (
HTTPRoute). - OpenShift Route — for OpenShift clusters.
The Operator's runtime Role grants permissions for all of these unconditionally so you can switch providers from this tab without re-rolling RBAC — see Operator runtime Role.
Part 2: Installing the CLI
The AI Gateway CLI is a command-line tool for deploying and managing AI Gateway in private cloud clusters.
Official CLI Installation Page: https://cequence.gitlab.io/ai-gateway/cli/
Installation from GitLab Pages
The CLI can be installed directly from the official installation page:
Quick Install (Latest Stable Release):
curl -sSL https://cequence.gitlab.io/ai-gateway/cli/install.sh | sh
Install Latest Snapshot (Development Build):
curl -sSL https://cequence.gitlab.io/ai-gateway/cli/install.sh | sh -s -- snapshot
Install Specific Version:
curl -sSL https://cequence.gitlab.io/ai-gateway/cli/install.sh | sh -s -- v1.0.0
Installation Process
The installer will:
-
Detect your platform
- Automatically detects your OS (Linux, macOS, Windows) and architecture (x86_64, ARM64)
-
Download the appropriate binary
- Downloads the correct binary for your platform from GitLab Pages
- Supports Linux, macOS (Intel and Apple Silicon), and Windows
-
Install to system path
- Installs to
/usr/local/bin(or~/.local/binif no sudo access) - Makes the binary executable
- Installs to
-
Verify installation
- Runs
aigateway versionto confirm installation
- Runs
Manual Installation
If you prefer manual installation:
-
Download the binary from https://cequence.gitlab.io/ai-gateway/cli/
- Select your platform (Linux x86_64, Linux ARM64, macOS Intel, macOS Apple Silicon, Windows)
- Download the latest release or snapshot
-
Extract the archive
# Linux/macOS
tar -xzf aigateway_<version>_<OS>_<ARCH>.tar.gz

# Windows
unzip aigateway_<version>_Windows_<ARCH>.zip -
Move to PATH
# Linux/macOS
sudo mv aigateway /usr/local/bin/
chmod +x /usr/local/bin/aigateway

# Or without sudo
mkdir -p ~/.local/bin
mv aigateway ~/.local/bin/
export PATH="$HOME/.local/bin:$PATH" -
Verify installation
aigateway version
Post-Installation Setup
After installation, initialize the CLI with your tenant and pool configuration.
Option 1: Copy Command from UI (Recommended)
If you've already created a pool, copy the initialization command directly from the pool detail page — see Pool Configuration Pending banner. The copied command includes all required parameters:
aigateway init --tenant <your-tenant-id> --pool-id <your-pool-id> --namespace <your-namespace>
Paste and run it in your terminal, then continue with authentication:
# Authenticate using OAuth device flow
aigateway login

# Verify configuration
aigateway config
Option 2: Manual Initialization
If you prefer to initialize manually or don't have a pool created yet:
# Initialize CLI with your tenant ID
aigateway init --tenant <your-tenant-id>

# Authenticate using OAuth device flow
aigateway login

# Verify configuration
aigateway config
Non-interactive CI/CD setup
The interactive aigateway login device flow above is intended for developer workstations. For CI/CD pipelines, GitOps controllers (Argo CD, Flux), and any other automated path, the CLI runs non-interactively, driven entirely by environment variables.
Instead of the OAuth device flow, the CLI authenticates with OAuth 2.0 client credentials. Generate a client ID and secret in the portal at Settings → Users → API Credentials (the same place User Management lives). Create a new entry and assign it the Super Admin role so it can install and manage pools, then copy the client ID and secret — the secret is shown only once at creation. Credentials are scoped to your tenant and can be rotated independently of any individual user.
Set the following in your pipeline:
| Variable | Required | Purpose |
|---|---|---|
AIGATEWAY_CI_MODE | Yes | Set to true. Switches authentication to OAuth client credentials (so no interactive device-flow prompt) and uses AIGATEWAY_CLIENT_ID / AIGATEWAY_CLIENT_SECRET for the API. |
AIGATEWAY_TENANT | Yes | Your tenant ID (same value used with aigateway init --tenant). |
AIGATEWAY_CLIENT_ID | Yes | OAuth client ID provided by Cequence. |
AIGATEWAY_CLIENT_SECRET | Yes | OAuth client secret. Store in your pipeline's secret store (never in source). |
AIGATEWAY_NAMESPACE | No | Target namespace; defaults to the pool's configured namespace. |
Pipeline deployment:
export AIGATEWAY_CI_MODE=true
export AIGATEWAY_TENANT="<your-tenant>"
export AIGATEWAY_CLIENT_ID="<oauth-client-id>"
export AIGATEWAY_CLIENT_SECRET="<oauth-client-secret>"   # from pipeline secret store
export AIGATEWAY_NAMESPACE="<pool-namespace>"

aigateway init --tenant "$AIGATEWAY_TENANT" --pool-id <pool-id> --namespace "$AIGATEWAY_NAMESPACE"
aigateway deploy install --wait
aigateway status --json
Commands that support JSON output (aigateway status, aigateway logs, aigateway events, aigateway cluster permissions, aigateway config show) accept a --json flag — pass it explicitly so the pipeline can gate on machine-readable output (for example jq '.summary.Unhealthy == 0').
GitLab CI example:
deploy_ai_gateway:
  stage: deploy
  image: alpine:latest
  variables:
    AIGATEWAY_CI_MODE: "true"
    AIGATEWAY_TENANT: "<your-tenant>"
    AIGATEWAY_CLIENT_ID: "<oauth-client-id>"
    AIGATEWAY_NAMESPACE: "ai-gateway"
    # AIGATEWAY_CLIENT_SECRET must be defined as a masked, protected CI/CD variable
  before_script:
    - curl -sSL https://cequence.gitlab.io/ai-gateway/cli/install.sh | sh
  script:
    - aigateway init --tenant "$AIGATEWAY_TENANT" --pool-id "$POOL_ID" --namespace "$AIGATEWAY_NAMESPACE"
    - aigateway deploy install --wait
    - aigateway status --json
  only:
    - main
Equivalent patterns work for GitHub Actions, Azure DevOps, Jenkins, and any other CI system — set the same AIGATEWAY_* variables in the job environment.
GitOps (Argo CD / Flux). GitOps controllers expect to manage Kubernetes manifests directly, while AI Gateway's manifests are generated and reconciled by the Operator from the control plane. The recommended pattern is:
- Treat the install step as a GitOps-managed Job, not a GitOps-managed manifest set. In your Git repository, commit a small Kubernetes
Job(or Argo CDPreSynchook / FluxKustomization) that runsaigateway deploy install --waitin CI/CD mode. Argo/Flux applies the Job; the Job invokes the CLI; the CLI talks to the control plane and reconciles the pool. - Bootstrap secrets through your usual GitOps secrets flow (Sealed Secrets, SOPS, ESO, External Secrets via Argo, etc.) so the
AIGATEWAY_CLIENT_SECRET, image-pull credentials, Redis password, and TLS material are all in place before the Job runs. - Pool configuration is owned by the control plane, not Git. Resource limits, ingress, image versions, and Redis mode are managed in the portal so that pool drift is reconciled by the Operator. Treat Git as the source of truth for the bootstrap, and the control plane as the source of truth for what runs.
This keeps the GitOps controller's surface small (one Job, plus secrets) and avoids fighting the Operator over ownership of Armor, Redis, and ingress resources.
Troubleshooting Installation
Issue: Binary not found after installation
- Check if the installation directory is in your PATH:
echo $PATH | grep -E "(/usr/local/bin|~/.local/bin)" - Add to PATH if needed:
# Add to ~/.bashrc, ~/.zshrc, or ~/.profile
export PATH="$HOME/.local/bin:$PATH"
Issue: Permission denied
- Make sure the binary is executable:
chmod +x /usr/local/bin/aigateway
Issue: Download fails
- Check network connectivity
- Verify GitLab Pages is accessible:
curl https://cequence.gitlab.io/ai-gateway/cli/ - Try installing from a different network or use a VPN
Part 3: Cluster Permissions
Before deploying AI Gateway, ensure you have the appropriate RBAC permissions in your Kubernetes cluster. This section is written so your security team can pre-review the full permission surface before any install runs.
Bootstrap vs steady-state permissions
There are two distinct permission scopes. Treat them differently in your security review.
| Phase | Who needs it | What it covers | Scope | When it's used |
|---|---|---|---|---|
| Bootstrap (one-time) | The human or service account running aigateway deploy install | Creating the target namespace (if absent), the Operator's ServiceAccount + Role + RoleBinding (skipped if a service account is provided in pool config), the API-auth Secret, the optional registry-credentials Secret, and the initial Operator Deployment | Namespace-scoped | Once per pool, at install. Can be revoked afterwards. |
| Steady-state (ongoing) | The Operator's own ServiceAccount | Reconciling Armor, Redis (when auto-installed), ingress, HPAs, PDBs, leader-election leases, and MCP server deployments inside the pool's namespace | Namespace-scoped only (Role, not ClusterRole) | Continuously, as the Operator runs |
The Operator never needs cluster-admin. Once the bootstrap is complete, all reconciliation happens inside the pool's namespace.
For security review: generate the exact deployer Role manifest with
aigateway cluster permissions --generate-role --namespace <ns>and share it with your platform/security team before scheduling the install.
What changes when you use a pool-provided ServiceAccount
If you set Service Account on the pool (Basic Information tab) to a pre-provisioned SA name, the bootstrap path skips creating the Operator's ServiceAccount, Role, and RoleBinding. It only verifies that the ServiceAccount exists in the namespace and prints the RBAC rules the ServiceAccount must already have bound. That changes what the deployer (the principal running aigateway deploy install) needs:
| Deployer permission | Default (CLI creates ServiceAccount + RBAC) | Pool-provided ServiceAccount |
|---|---|---|
serviceaccounts create/update/patch | Required | Not required |
rbac.authorization.k8s.io/roles create/update/patch | Required | Not required |
rbac.authorization.k8s.io/rolebindings create/update/patch | Required | Not required |
serviceaccounts get | Required (verify) | Required (verify ServiceAccount exists) |
| Everything else in Deployer Permissions below | Required | Required |
When you use a pool-provided ServiceAccount, the responsibility for binding the Operator's runtime Role to the ServiceAccount shifts to your platform team. Use the Operator runtime Role section below as the source of truth for what the ServiceAccount must be able to do.
Deployer Permissions
These are the namespace-scoped permissions the deployer needs to run aigateway deploy install. This matches what aigateway cluster permissions --generate-role --namespace <ns> outputs.
Core workload resources
| Resource | API Group | Verbs | Purpose |
|---|---|---|---|
deployments | apps | get, list, watch, create, update, patch, delete | Deploy Operator, Armor, and SIEM components |
statefulsets | apps | get, list, watch, create, update, patch, delete | Manage Redis (auto-install mode) |
services | core | get, list, watch, create, update, patch, delete | Create service endpoints |
secrets | core | get, list, watch, create, update, patch, delete | Manage API credentials and registry secrets |
configmaps | core | get, list, watch, create, update, patch, delete | Store configuration data |
persistentvolumeclaims | core | get, list, watch, create, update, patch, delete | Persistent storage for Redis (auto-install mode) |
pods | core | get, list, watch | Monitor pod health and status |
pods/exec | core | create | Operator runtime operations |
events | core | get, list | View Kubernetes events for troubleshooting |
Scaling
| Resource | API Group | Verbs | Purpose |
|---|---|---|---|
horizontalpodautoscalers | autoscaling | get, list, watch, create, update, patch, delete | Auto-scale Armor and MCP deployments |
Networking
| Resource | API Group | Verbs | Purpose |
|---|---|---|---|
ingresses | networking.k8s.io | get, list, watch, create, update, patch, delete | Expose MCP servers externally |
RBAC (required unless using a pool-provided ServiceAccount)
| Resource | API Group | Verbs | Purpose |
|---|---|---|---|
serviceaccounts | core | get, create, update, patch (or just get with a pool-provided ServiceAccount) | Create or verify the Operator's ServiceAccount |
roles | rbac.authorization.k8s.io | get, create, update, patch (omitted with a pool-provided ServiceAccount) | Create the Operator's Role |
rolebindings | rbac.authorization.k8s.io | get, create, update, patch (omitted with a pool-provided ServiceAccount) | Bind the Operator's Role to its ServiceAccount |
Operator runtime Role
The Operator's runtime Role is created automatically by the bootstrap step (or, when a pool-provided ServiceAccount is used, must be pre-bound by your platform team). It is broader than the deployer's permissions because it also covers what the Operator needs during steady-state reconciliation. The full set of rules is:
| Resource | API Group | Verbs | Purpose |
|---|---|---|---|
pods, services, configmaps, secrets, persistentvolumeclaims | core | get, list, watch, create, update, patch, delete | Manage Armor, Redis (auto-install), and MCP workloads + their config/state |
events | core | get, list, watch | Surface cluster events into pool diagnostics |
pods/exec | core | create | Operator-side maintenance into pods |
deployments, statefulsets | apps | get, list, watch, create, update, patch, delete | Manage Armor, Redis StatefulSet (auto-install), MCP Deployments |
ingresses | networking.k8s.io | get, list, watch, create, update, patch, delete | Default ingress mode |
horizontalpodautoscalers | autoscaling | get, list, watch, create, update, patch, delete | Auto-scale Armor and MCP deployments |
poddisruptionbudgets | policy | get, list, watch, create, update, patch, delete | HA safeguards on Armor / Redis (auto-install) / MCP deployments |
leases | coordination.k8s.io | get, list, watch, create, update, patch, delete | Operator leader election |
gateways, virtualservices | networking.istio.io | get, list, watch, create, update, patch, delete | Istio ingress mode |
ingressroutes | traefik.io | get, list, watch, create, update, patch, delete | Traefik ingress mode |
httproutes | gateway.networking.k8s.io | get, list, watch, create, update, patch, delete | Kubernetes Gateway API ingress mode |
routes | route.openshift.io | get, list, watch, create, update, patch, delete | OpenShift routes |
The four ingress-provider rules (Istio, Traefik, Gateway API, OpenShift) are granted unconditionally even if your pool currently uses a different mode. The Operator reads them at startup, and ingress mode can be changed later from the portal without re-rolling RBAC. Granting them on a cluster that doesn't have those CRDs installed is harmless — RBAC rules for absent resources are simply unused.
The bootstrap step creates this Role and a RoleBinding to the Operator's ServiceAccount. When you use a pool-provided ServiceAccount, you must create this Role yourself and bind it to your ServiceAccount before running aigateway deploy install — the CLI verifies the ServiceAccount exists but does not create or modify any RBAC for it.
Example Operator runtime Role (verified against a live aigw-operator Role; all four ingress-provider rules included because the CLI and Operator support all of them — keep the ones that match your ingress mode and comment out the rest if your platform team prefers a narrower manifest):
apiVersion: rbac.authorization.k8s.io/v1
kind: Role
metadata:
  name: aigw-operator
  namespace: ai-gateway
rules:
# Core workload resources
- apiGroups: [""]
  resources: ["pods", "services", "configmaps", "secrets", "persistentvolumeclaims"]
  verbs: ["get", "list", "watch", "create", "update", "patch", "delete"]
- apiGroups: [""]
  resources: ["events"]
  verbs: ["get", "list", "watch"]
- apiGroups: [""]
  resources: ["pods/exec"]
  verbs: ["create"]
- apiGroups: ["apps"]
  resources: ["deployments", "statefulsets"]
  verbs: ["get", "list", "watch", "create", "update", "patch", "delete"]

# Scaling and high availability
- apiGroups: ["autoscaling"]
  resources: ["horizontalpodautoscalers"]
  verbs: ["get", "list", "watch", "create", "update", "patch", "delete"]
- apiGroups: ["policy"]
  resources: ["poddisruptionbudgets"]
  verbs: ["get", "list", "watch", "create", "update", "patch", "delete"]
- apiGroups: ["coordination.k8s.io"]
  resources: ["leases"]
  verbs: ["get", "list", "watch", "create", "update", "patch", "delete"]

# --- Ingress: default (Kubernetes Ingress, includes AWS ALB / nginx / GKE / AKS / Azure App Gateway) ---
- apiGroups: ["networking.k8s.io"]
  resources: ["ingresses"]
  verbs: ["get", "list", "watch", "create", "update", "patch", "delete"]

# --- Ingress: Istio service mesh ---
- apiGroups: ["networking.istio.io"]
  resources: ["gateways", "virtualservices"]
  verbs: ["get", "list", "watch", "create", "update", "patch", "delete"]

# --- Ingress: Traefik ---
- apiGroups: ["traefik.io"]
  resources: ["ingressroutes"]
  verbs: ["get", "list", "watch", "create", "update", "patch", "delete"]

# --- Ingress: Kubernetes Gateway API ---
- apiGroups: ["gateway.networking.k8s.io"]
  resources: ["httproutes"]
  verbs: ["get", "list", "watch", "create", "update", "patch", "delete"]

# --- Ingress: OpenShift routes ---
- apiGroups: ["route.openshift.io"]
  resources: ["routes"]
  verbs: ["get", "list", "watch", "create", "update", "patch", "delete"]
The bootstrap creates this Role with all ingress-provider rules included regardless of which mode your pool currently uses — that's the safest default (changing ingress mode later from the portal doesn't require re-rolling RBAC). If your platform team prefers a tighter manifest, comment out the rule groups for ingress providers you're not using; just remember to re-apply if you ever change the pool's ingress mode.
Bind the Role to your ServiceAccount:
apiVersion: rbac.authorization.k8s.io/v1
kind: RoleBinding
metadata:
  name: aigw-operator
  namespace: ai-gateway
subjects:
- kind: ServiceAccount
  name: <your-pool-service-account-name>
  namespace: ai-gateway
roleRef:
  kind: Role
  name: aigw-operator
  apiGroup: rbac.authorization.k8s.io
Checking Permissions
Use the CLI to verify you have the required permissions:
# Check permissions for specific namespace
aigateway cluster permissions --namespace ai-gateway

# JSON output for automation
aigateway cluster permissions --namespace ai-gateway --json
Setting Up RBAC
If you lack sufficient permissions, generate and apply the deployer Role:
Step 1: Generate the deployer Role
aigateway cluster permissions --generate-role --namespace ai-gateway > aigateway-deployer-role.yaml
Example output (verified against CLI v1.0.10):
apiVersion: rbac.authorization.k8s.io/v1
kind: Role
metadata:
  name: aigateway-deployer
  namespace: ai-gateway
rules:
- apiGroups: ["apps"]
  resources: ["deployments"]
  verbs: ["get", "list", "watch", "create", "update", "patch", "delete"]
- apiGroups: ["apps"]
  resources: ["statefulsets"]
  verbs: ["get", "list", "watch", "create", "update", "patch", "delete"]
- apiGroups: [""]
  resources: ["services"]
  verbs: ["get", "list", "watch", "create", "update", "patch", "delete"]
- apiGroups: [""]
  resources: ["secrets"]
  verbs: ["get", "list", "watch", "create", "update", "patch", "delete"]
- apiGroups: [""]
  resources: ["configmaps"]
  verbs: ["get", "list", "watch", "create", "update", "patch", "delete"]
- apiGroups: [""]
  resources: ["persistentvolumeclaims"]
  verbs: ["get", "create", "update", "patch"]
- apiGroups: [""]
  resources: ["pods"]
  verbs: ["get", "list", "watch"]
- apiGroups: [""]
  resources: ["pods/exec"]
  verbs: ["create"]
- apiGroups: [""]
  resources: ["events"]
  verbs: ["get", "list"]
- apiGroups: ["networking.k8s.io"]
  resources: ["ingresses"]
  verbs: ["get", "list", "watch", "create", "update", "patch", "delete"]
- apiGroups: ["autoscaling"]
  resources: ["horizontalpodautoscalers"]
  verbs: ["get", "list", "watch", "create", "update", "patch", "delete"]
- apiGroups: [""]
  resources: ["serviceaccounts"]
  verbs: ["get", "create", "update", "patch"]
- apiGroups: ["rbac.authorization.k8s.io"]
  resources: ["roles"]
  verbs: ["get", "create", "update", "patch"]
- apiGroups: ["rbac.authorization.k8s.io"]
  resources: ["rolebindings"]
  verbs: ["get", "create", "update", "patch"]
This is the deployer Role only — namespace-scoped, used to run aigateway deploy install. It does not include the Operator's runtime resources (policy/poddisruptionbudgets, coordination.k8s.io/leases, and the Istio/Traefik/Gateway-API/OpenShift ingress-provider resources). Those go in the separate Operator runtime Role, which the bootstrap creates automatically when it provisions the Operator's ServiceAccount.
If you provide a pre-existing ServiceAccount on the pool (set on the Basic Information tab), the bootstrap does not create or modify any Role/RoleBinding — you must construct the Operator runtime Role yourself based on the table in Operator runtime Role and bind it to your ServiceAccount before running aigateway deploy install.
Note: The CLI's emitted YAML uses unquoted flow-style verb lists (for example
verbs: [get list watch ...]). That's valid syntactically in some YAML parsers but not in others — ifkubectl applyrejects it, normalise the verbs into a quoted comma-separated list as shown above (verbs: ["get", "list", "watch", ...]). The semantics are identical.
Step 2: Create RoleBinding
Bind the Role to your user or service account:
apiVersion: rbac.authorization.k8s.io/v1
kind: RoleBinding
metadata:
  name: aigateway-deployer-binding
  namespace: ai-gateway
subjects:
- kind: User
  name: your-username@company.com  # Replace with your username
  apiGroup: rbac.authorization.k8s.io
roleRef:
  kind: Role
  name: aigateway-deployer
  apiGroup: rbac.authorization.k8s.io
Step 3: Apply
kubectl apply -f aigateway-deployer-role.yaml
kubectl apply -f aigateway-deployer-rolebinding.yaml
For CI/CD: Use a ServiceAccount instead of User in the RoleBinding:
subjects:
- kind: ServiceAccount
  name: aigateway-deployer
  namespace: ai-gateway
Skipping Permission Checks
Use the --skip-permission-checks flag if permission validation fails but you know you have the necessary permissions:
aigateway deploy install --skip-permission-checks
Warning: Only use this if you've verified your permissions. Deployment will fail if you lack required permissions.
What to share with your security team
For a pre-install review, the artifacts to hand over are:
- The deployer Role manifest — generate with
aigateway cluster permissions --generate-role --namespace <ns>(see Setting Up RBAC for an example). - The Operator runtime Role — the table in Operator runtime Role lists everything the Operator's ServiceAccount gets bound to (created automatically by the bootstrap, or constructed manually when a pool-provided ServiceAccount is used).
- The full set of manifests the Operator would apply —
aigateway deploy install --dry-run --show-manifests. This is for review only, not a fork-and-maintain path; see Deployment Model. - The image list (or release path) for supply-chain review — see Mirroring images from your internal artifact registry on the pool's image fields.
- The list of egress endpoints the Operator and Armor need to reach (control plane heartbeat, OAuth token endpoint, image registry, telemetry). Your account team can provide the egress endpoint list for your region on request.
Troubleshooting
Common Issues:
| Issue | Solution |
|---|---|
namespace not found | Have admin create namespace: kubectl create namespace ai-gateway |
roles.rbac.authorization.k8s.io is forbidden | Use existing service account or ask admin to create RBAC resources |
storageclasses is forbidden | Use --skip-permission-checks flag |
| Permissions not working after applying Role | Verify RoleBinding references correct user/namespace, wait for RBAC cache update |
Part 4: Deploying the Operator
Once you've created a pool, installed the CLI, and verified your cluster permissions, you can deploy the AI Gateway Operator to your Kubernetes cluster. The Operator handles everything else — it connects to the Cequence control plane, deploys Armor, and manages the lifecycle of all components in your pool.
Prerequisites
- Kubernetes cluster access configured (
kubectlworking) - Pool created in the UI (see Part 1)
- CLI installed and authenticated (see Part 2)
- Appropriate RBAC permissions in the cluster
Step-by-Step: Deployment
-
Verify Cluster Access
# Check kubectl is configured
kubectl cluster-info

# Verify you can access the cluster
kubectl get nodes -
Initialize CLI Configuration
# Set your tenant ID
aigateway init --tenant <your-tenant-id> --pool-id <pool-id>

# Authenticate
aigateway login -
Deploy the Operator
Basic Installation:
# Deploy to default namespace (from pool configuration)
aigateway deploy install
Installation with Options:
# Deploy and wait for readiness
aigateway deploy install --wait

# Dry run to see what would be deployed
aigateway deploy install --dry-run

# Show processed manifests
aigateway deploy install --dry-run --show-manifests
Image and replica configuration go through the pool, not the CLI. Set the Operator image, Armor image, and replica count on the pool's Advanced tab in the portal — that keeps configuration in one place and survives upgrades. See Mirroring images to an internal registry.
Skip Permission Checks:
Use the
--skip-permission-checksflag if you encounter permission errors like the following:[INFO] Performing comprehensive pre-flight validation...
Error: failed to apply manifests: pre-flight validation failed: failed to check storage classes: storageclasses.storage.k8s.io is forbidden: User "user@example.com" cannot list resource "storageclasses" in API group "storage.k8s.io" at the cluster scope# Skip permission checks
aigateway deploy install --skip-permission-checks -
Monitor Deployment
After the CLI deploys the Operator, it will automatically:
- Connect to the Cequence control plane
- Deploy the Armor gateway
- Set up Redis (if configured for auto-install)
- Configure ingress routing
- Begin reporting health via heartbeat
You can monitor progress with:
# Check deployment status
aigateway status

# Watch status in real-time
aigateway status --watch

# Detailed status information
aigateway status --verbose

# View Operator logs
aigateway logs

# View events
aigateway events

# Monitor with comprehensive dashboard
aigateway monitor -
Verify Deployment
# Check pods are running
kubectl get pods -n <namespace>

# Check services
kubectl get svc -n <namespace>

# Check ingress (if configured)
kubectl get ingress -n <namespace>
You can also verify from the UI:
- Navigate to Private Cloud and select your pool
- The pool status should show Active with a recent heartbeat timestamp
- The Operator Status section displays version information and component health
What the Operator Deploys
After installation, the Operator automatically manages the following components in your cluster:
| Component | What it does |
|---|---|
| Armor | Data plane gateway — routes and secures all agent traffic |
| Redis | Session state and caching — production: connects to your enterprise/managed Redis (manual mode). Dev/POV: runs in-cluster as a 3-node Sentinel HA cluster (auto-install) |
| Ingress | External routing rules for your configured hostname |
| SIEM Exporter | Audit event forwarding (if configured) |
You do not need to deploy or configure these components manually. The Operator creates, updates, and monitors them based on your pool configuration.
Common Deployment Scenarios
Scenario 1: Standard Production Deployment
# Initialize and authenticate
aigateway init --tenant <your-tenant-id> --pool-id <your-pool-id>
aigateway login

# Deploy
aigateway deploy install
Scenario 2: Inspect the manifests before applying
aigateway deploy install --dry-run --show-manifests
Upgrading an Existing Deployment
The Operator can self-update when new versions are available. You can also trigger an upgrade manually:
# Upgrade to latest version
aigateway deploy upgrade

# Upgrade with specific options
aigateway deploy upgrade --wait

# Check what would be upgraded
aigateway deploy upgrade --dry-run
Uninstalling
# Remove AI Gateway from cluster
aigateway deploy uninstall

# Dry run to see what would be removed
aigateway deploy uninstall --dry-run
Warning: Uninstalling will delete all resources including the Operator, Armor, Redis, and any persistent data.
Troubleshooting Deployment
Issue: Deployment fails
# Check deployment status
aigateway status --verbose

# View error logs
aigateway logs --errors --since 10m

# Check Kubernetes events
aigateway events --critical

# Generate troubleshooting report
aigateway deploy troubleshoot
Issue: Pods not starting
# Check pod status
kubectl get pods -n <namespace>

# Describe problematic pod
kubectl describe pod <pod-name> -n <namespace>

# View pod logs
kubectl logs <pod-name> -n <namespace>

# Check events
kubectl get events -n <namespace> --sort-by='.lastTimestamp'
Issue: Image pull errors
- Verify registry credentials secret exists:
kubectl get secret regcred -n <namespace> - Check registry credentials are correct
- Verify network access to container registry
Issue: Ingress not working
- Verify ingress controller is installed:
kubectl get ingressclass - Check ingress resource:
kubectl get ingress -n <namespace>
kubectl describe ingress <ingress-name> -n <namespace> - Verify DNS configuration points to ingress
Issue: Operator not connecting (pool stays in Pending or Stale)
- Verify the Operator pod is running:
kubectl get pods -n <namespace> -l app=ai-gateway-operator - Check Operator logs for connectivity errors:
kubectl logs -n <namespace> -l app=ai-gateway-operator - Ensure outbound HTTPS access to the Cequence control plane is not blocked by firewall or network policy
Post-Deployment Verification��
After successful deployment, verify:
-
All pods are running:
kubectl get pods -n <namespace>
# Should show: Operator, Armor, Redis (if auto-install), etc. -
Services are created:
kubectl get svc -n <namespace> -
Operator is healthy and connected:
aigateway status
# Should show all components as healthy
Or check the Private Cloud page in the portal — your pool should show Active status with a recent heartbeat.
-
Logs are clean:
aigateway logs --errors
# Should show no errors
Pool Operations
Once your pool is deployed and active, you can perform these operations from the Private Cloud page in the portal or via the API:
Assigning MCP Servers to a Pool
- Navigate to your MCP server in the portal
- Select Deploy to Private Cloud
- Choose the target pool and enter an MCP prefix (for example,
crm-api) - The Operator picks up the change and deploys the MCP server — typically within 60 seconds
- Your MCP server is now accessible at
https://{pool-host}/{mcp-prefix}/mcp
Force Sync
If you've made configuration changes and want them applied immediately (rather than waiting for the next sync cycle), use the Force Sync action from the pool detail page. This tells the Operator to re-read its configuration and reconcile immediately.
Reseed
If a pool's configuration becomes out of sync (shown in the pool health dashboard), use the Reseed action to rebuild all configuration from the source of truth. This is a safe operation — it regenerates configuration without affecting running traffic.
Monitoring Pool Health
The Private Cloud page shows the health of all pools at a glance:
- Active pools with recent heartbeats are healthy
- Stale pools (no heartbeat in 30+ minutes) may have networking issues
- Out of sync pools have configuration drift and may need a force-sync or reseed
Cell-based isolation
A single pool often hosts workloads with very different risk profiles — a battle-tested production server sitting next to a brand-new one you're still evaluating. Cell-based isolation lets you split one pool into separate isolation tiers ("cells") so that an experimental or misbehaving server can't disrupt your production traffic. Each enabled tier runs its own Armor gateway behind a lightweight router, so a problem in one tier stays contained there.
By default a pool is single-cell — one shared Armor for everything. Turn on cell-based isolation when you want that blast-radius separation.
The three tiers
| Tier | Best for | Characteristics |
|---|---|---|
| Critical | Production servers you depend on | Dedicated capacity, strict quotas, insulated from canaries |
| Standard | The general fleet — most servers | Elastic, shared capacity. The default tier |
| Experimental | New or in-evaluation servers (canaries) | Tight blast radius, capped resources |
Standard is always on whenever isolation is enabled — it's the fallback tier. You choose whether to also run Critical, Experimental, or both.
Enabling isolation on a pool
- Open the pool's detail page and find the Cell Isolation card.
- Select the edit (pencil) icon.
- Choose the tiers this pool should run (Standard is always included). For example, enable Standard + Experimental to keep canaries away from your main fleet, or all three for full separation.
- Save. The Operator brings up a dedicated Armor for each enabled tier and routes traffic accordingly — typically within a minute or two.
A single-cell pool (no tiers selected) behaves exactly as before — one Armor for the whole pool.
Assigning a server or persona to a tier
Cell assignment lives on the pool's detail page — not the MCP-server or persona add/edit screens. From the pool's MCP servers or personas list, open a resource's Configure dialog; on a multi-cell pool it shows an Isolation cell selector listing the tiers the pool runs.
- By default a server or persona lands in Standard — the shared default tier. Move it to Experimental while you're still evaluating it (to keep it off your main fleet), or promote it to Critical once it's proven.
- The selector only offers tiers the pool actually runs, so a server can't be pinned to a tier that doesn't exist.
- Assigning a server or persona to the Critical tier is restricted to administrators.
Automating with the API? The portal keeps tier selection on the pool page to keep the day-to-day flow simple, but the API is fully capable:
cellis accepted on the MCP-server and persona create/update endpoints, andcellson the pool endpoints — so scripted and CI-driven workflows can assign isolation directly.
Changing or disabling tiers
You can change a pool's enabled tiers at any time from the Cell Isolation card. If you disable a tier that still has servers or personas assigned to it, those resources automatically fall back to Standard so they keep serving traffic — nothing goes offline.
Tips
Pool Configuration
- Use descriptive names for pools (include environment and region)
- Set appropriate resource limits based on expected workload
- Enable TLS for production deployments
- For production, use an enterprise/managed Redis (ElastiCache, Memorystore, Azure Cache, Redis Enterprise) in Manual mode — the bundled Auto-install Redis is HA-capable (3-node Sentinel) but is intended for dev, POV, and self-contained installs.
- Use cell-based isolation to keep new or experimental servers off your production tier — enable Standard + Experimental and move a server to Experimental while you evaluate it, then promote it once it's proven.
- Configure ingress annotations for production (cert-manager, SSL redirect, etc.)
CLI Usage
- Always use
--waitin production to ensure deployment completes - Use
--dry-runfirst to verify configuration - Monitor deployments with
aigateway status --watch - Keep CLI updated to latest version
- Use structured output (
--json) for automation
Security
- Store credentials securely (use Kubernetes secrets, not plain text)
- Use least-privilege RBAC (generate roles with
aigateway cluster permissions --generate-role) - Enable TLS for all production deployments
- Regularly rotate API credentials and registry secrets
Monitoring
- Check pool health regularly from the Private Cloud page
- Watch for stale heartbeats — they may indicate networking issues between your cluster and the control plane
- Use force-sync after configuration changes for immediate application
- Use
aigateway monitorfor comprehensive real-time monitoring
Additional Resources
- CLI Documentation: See
cli/README.mdfor complete CLI reference - Pool Management: Edit pools from the UI after creation
- MCP Server Deployment: Once pool is configured, deploy MCP servers through the UI
- Troubleshooting: Use
aigateway deploy troubleshootfor detailed diagnostics
Summary
This article covered:
- Creating pools from the UI with all configuration options, including bring-your-own Redis and mirroring images from your internal registry
- Installing the CLI from GitLab Pages, including non-interactive setup for CI/CD and GitOps pipelines
- Verifying cluster permissions and setting up RBAC, including the pool-provided ServiceAccount path
- Deploying the Operator to your cluster using the CLI
- Pool operations — assigning MCP servers, force-sync, reseed, and health monitoring
- Cell-based isolation — splitting a pool into Critical / Standard / Experimental tiers to contain blast radius
You should now be able to:
- Create and configure pools for your Kubernetes clusters
- Install and set up the AI Gateway CLI
- Check and configure required Kubernetes RBAC permissions
- Deploy the AI Gateway Operator to your private cloud clusters
- Assign MCP servers to pools and monitor their health
- Troubleshoot common deployment issues
For additional help, refer to the CLI help:
aigateway --help
aigateway deploy --help
aigateway status --help
Cequence AI Gateway