Getting Started
The Cequence AI Gateway enables you to create MCP servers in two ways:
- From OpenAPI Specifications: Upload an OpenAPI spec to create an MCP server that wraps your REST API
- From Remote MCP Servers: Connect to existing MCP servers and proxy their tools through the AI Gateway
Both approaches let you add authentication, security policies, and monitoring to your MCP tools.
Once you have the MCP server defined, you can connect the server to your LLM tool of choice. The Cequence AI Gateway directly supports integration with Claude, Cursor, and the Windsurf IDE, and you can also manually integrate with any other LLM you're using.
Quick Start Options
Option 1: Create from OpenAPI Specification
Define an 'app' within the App Catalog. In this context, an app is just a container for an API specification that lets you specify some tags and other metadata for organization. You can launch the MCP server creation flow directly and upload the API specification from there.
Option 2: Connect Remote MCP Server
Connect to an existing MCP server by providing its URL and authentication credentials. The AI Gateway will discover available tools and create a proxy MCP server. See Adding a Remote MCP Server below.
Creating an App (OpenAPI Specification)
This section covers creating an MCP server from an OpenAPI specification.
Once you've logged in to the Cequence AI Gateway, select App Catalog. Several apps are already available, but for this example we'll make a new one. Select New App in the top right, then choose OpenAPI Specification. The Add Custom App dialog appears:
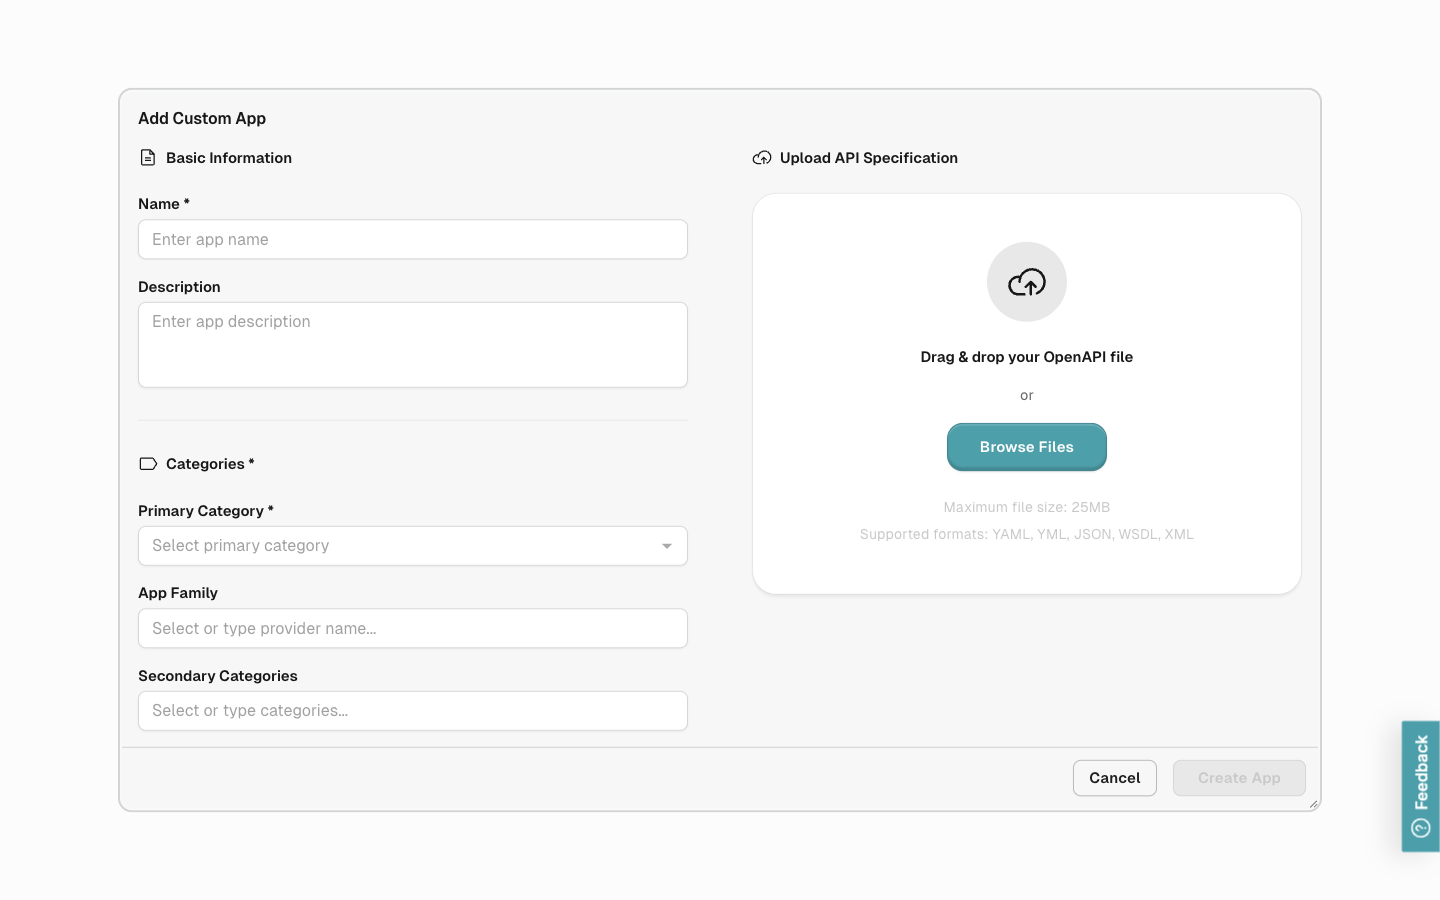
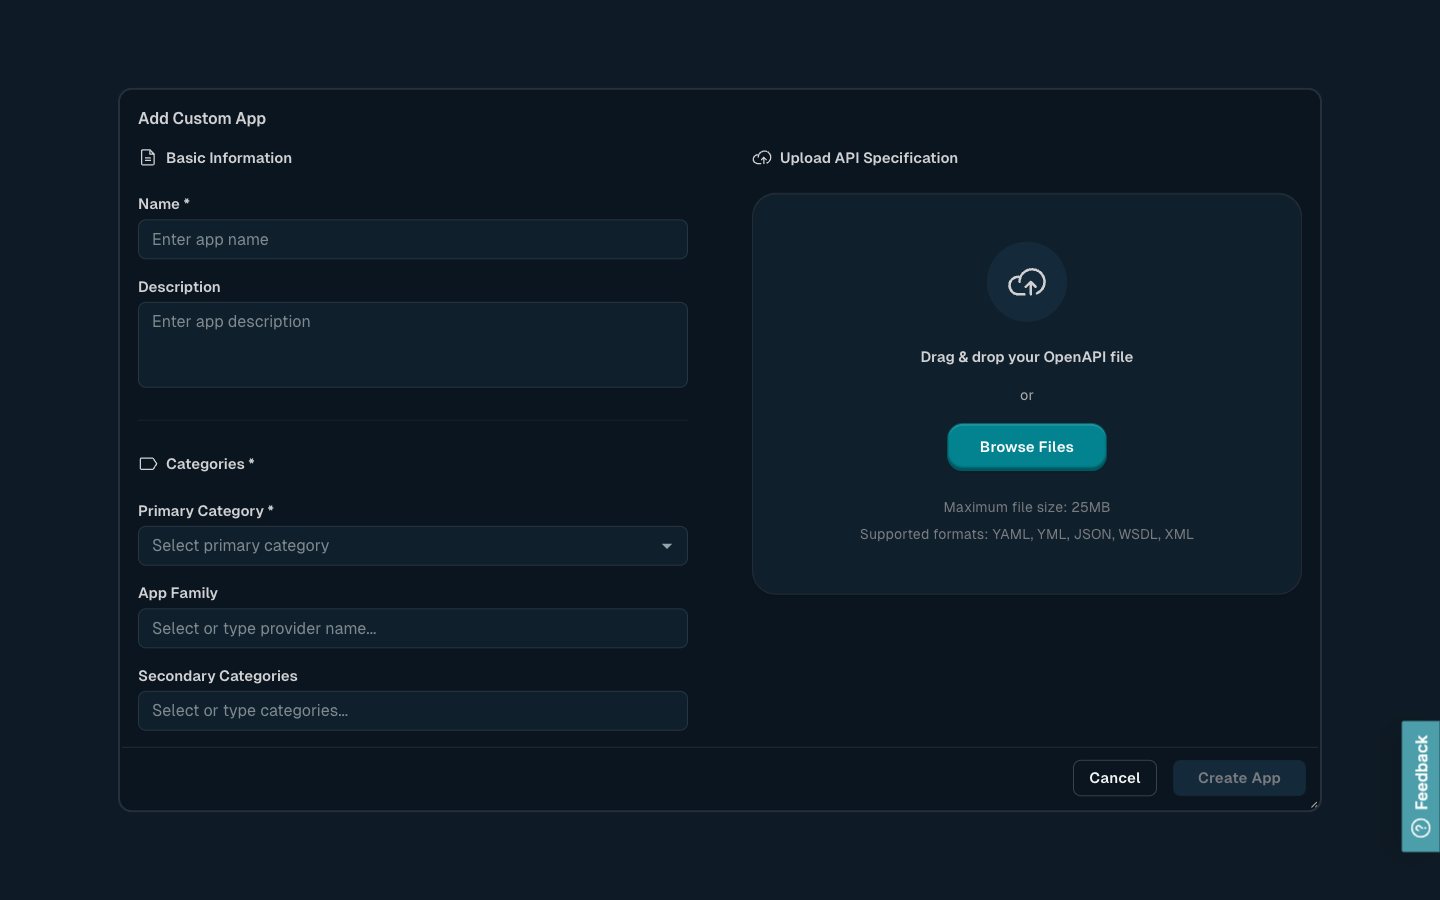
Enter a Name, choose a Primary Category, and upload your API specification — drag the file onto the upload area on the right, or select Browse Files. The file must be in the OpenAPI format. Description, app family, and secondary categories are optional and help you organize and find apps later.
Select Create App to return to the App Catalog. You're ready to start the MCP server that provides the new app's functionality.
Create the MCP Server from an App
Find your new app in the App Catalog. You can select the paired arrows icon to show the sorting options. Select Newest to Oldest to show the app you just created at the top of the App Catalog.
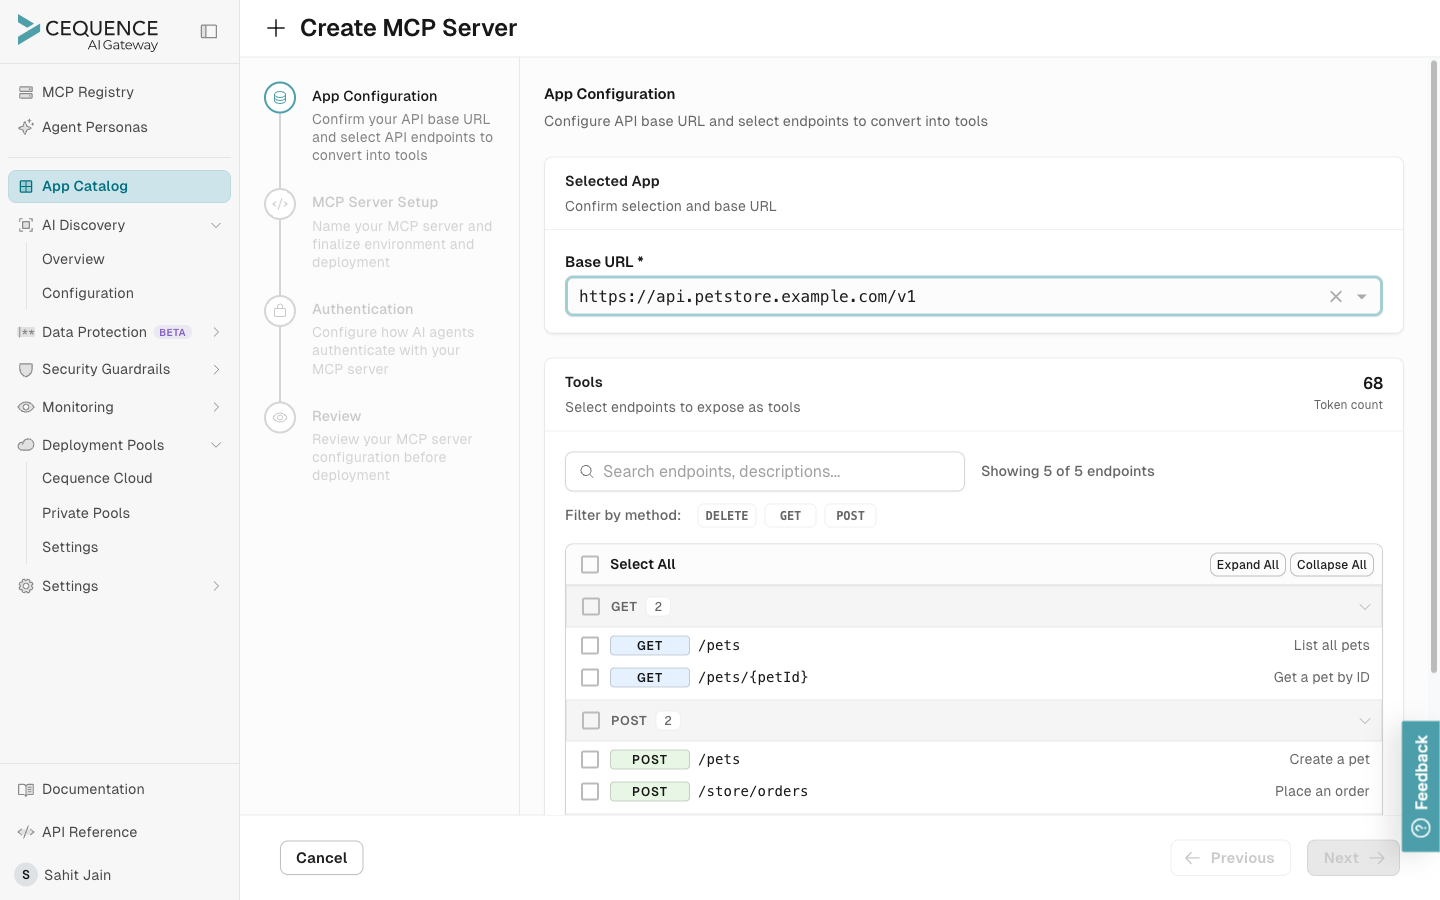
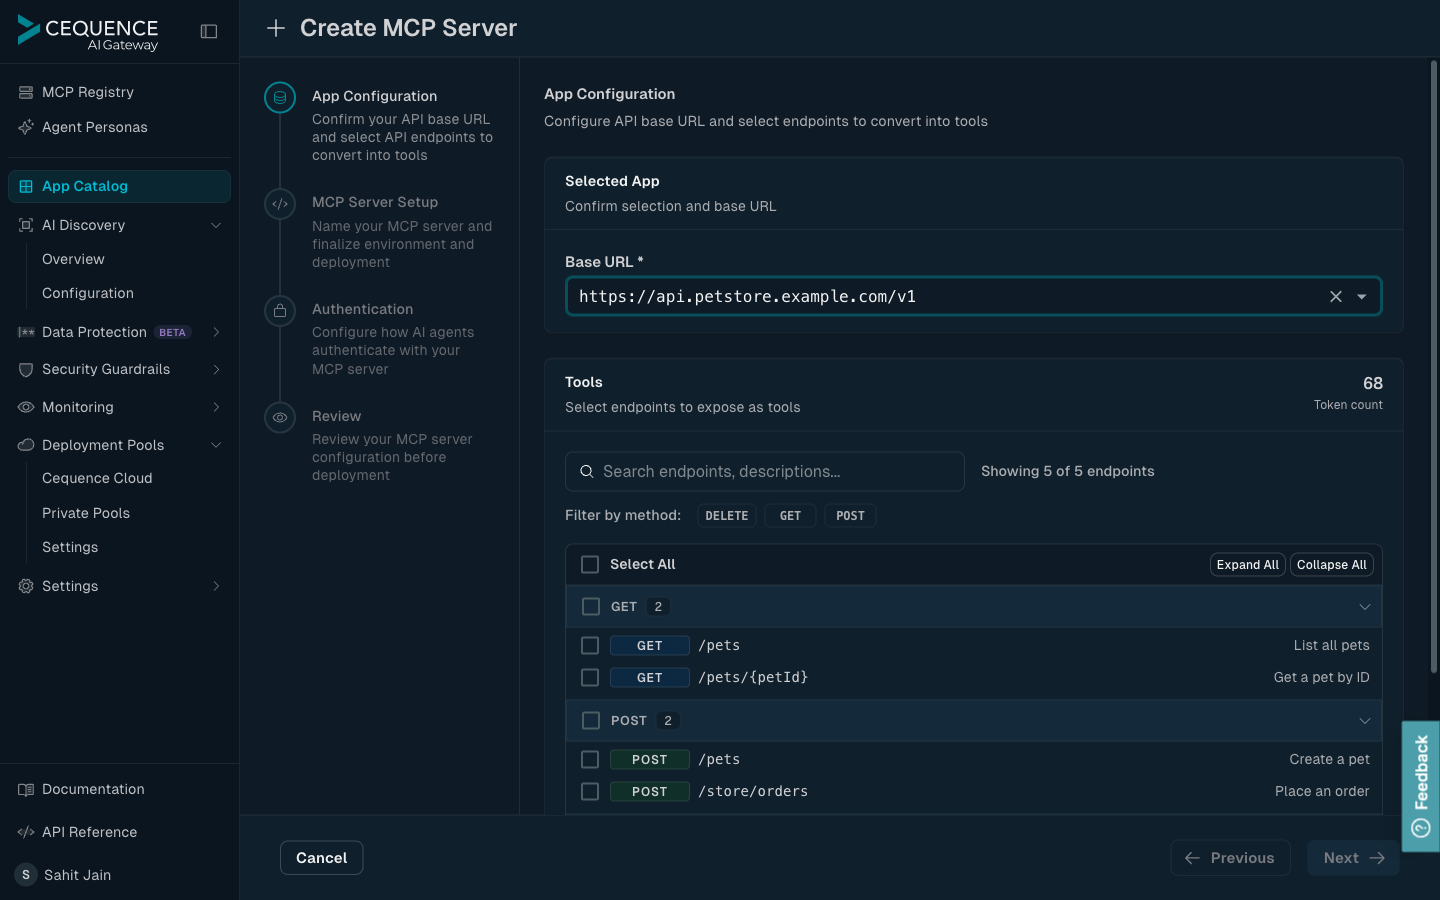
Select your new app to show a summary of the API specification associated with that app. Select Create MCP Server to start. The Create MCP Server wizard appears, with four steps: App Configuration, MCP Server Setup, Authentication, and Review.
App Configuration
Confirm the Base URL — the Cequence AI Gateway derives it from the API specification you uploaded. Then, under Tools, select the API endpoints to expose. Use the search field or the Filter by method buttons to narrow the list. Select your endpoints and choose Next.
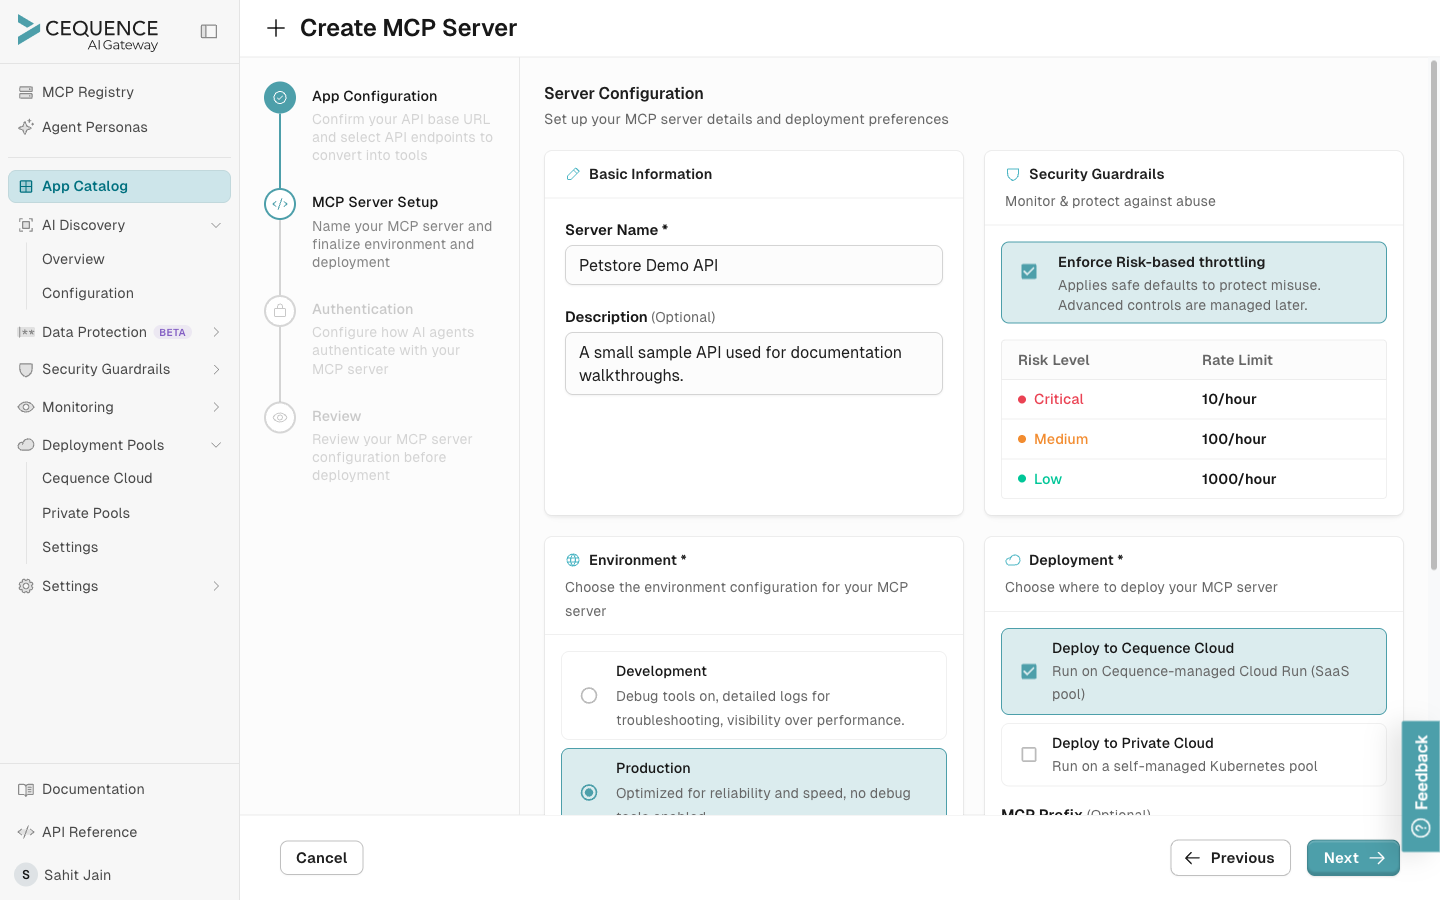
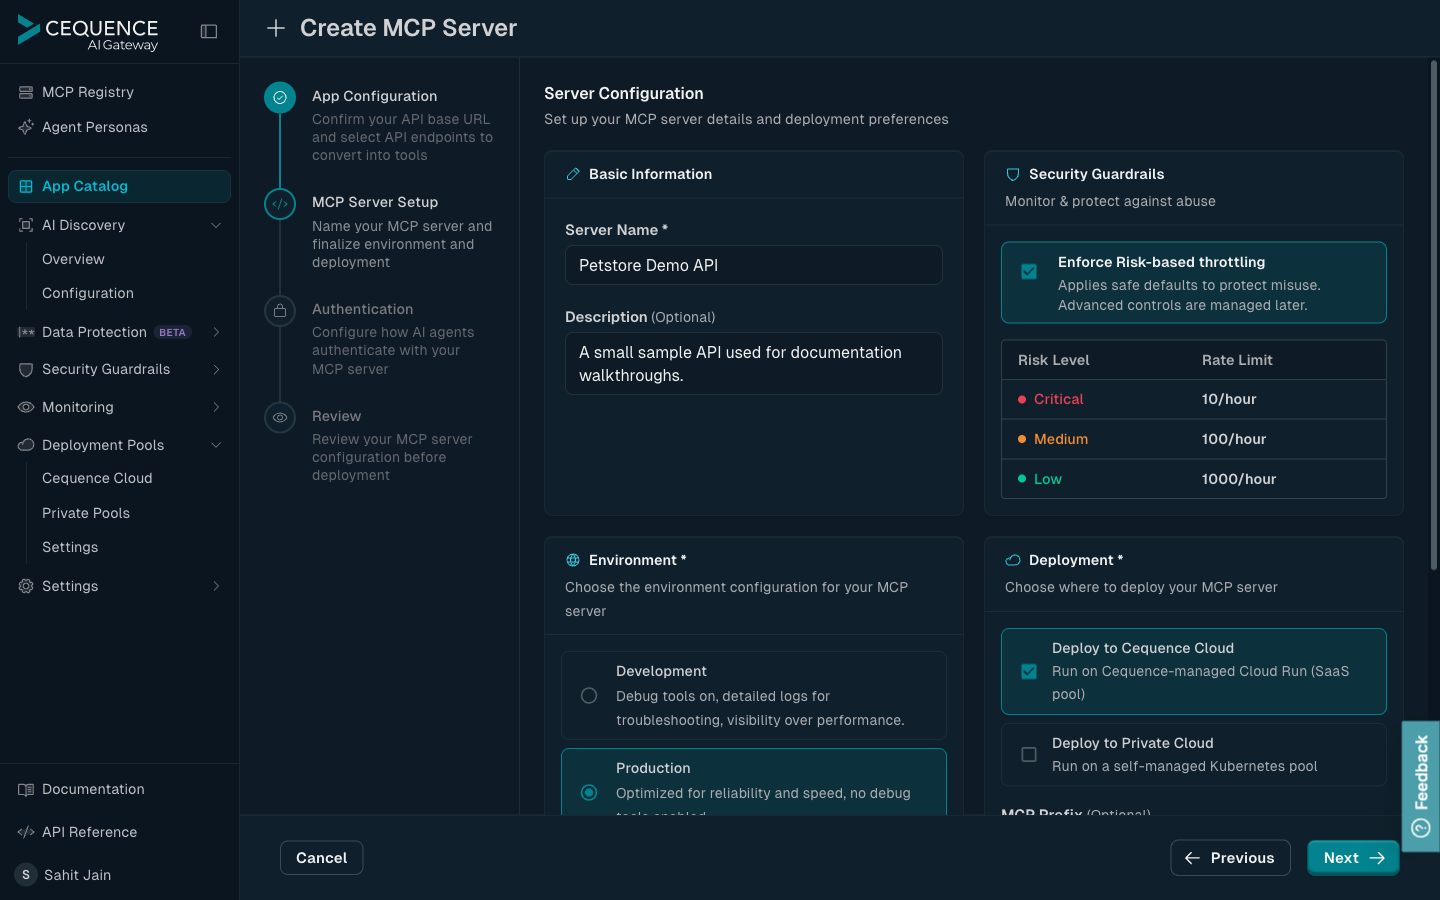
MCP Server Setup
Change the server name and description if needed, and set the log level. Production Mode produces terser logs; Non-Production Mode is more verbose, which can help with debugging or tracing. Select Next to advance.
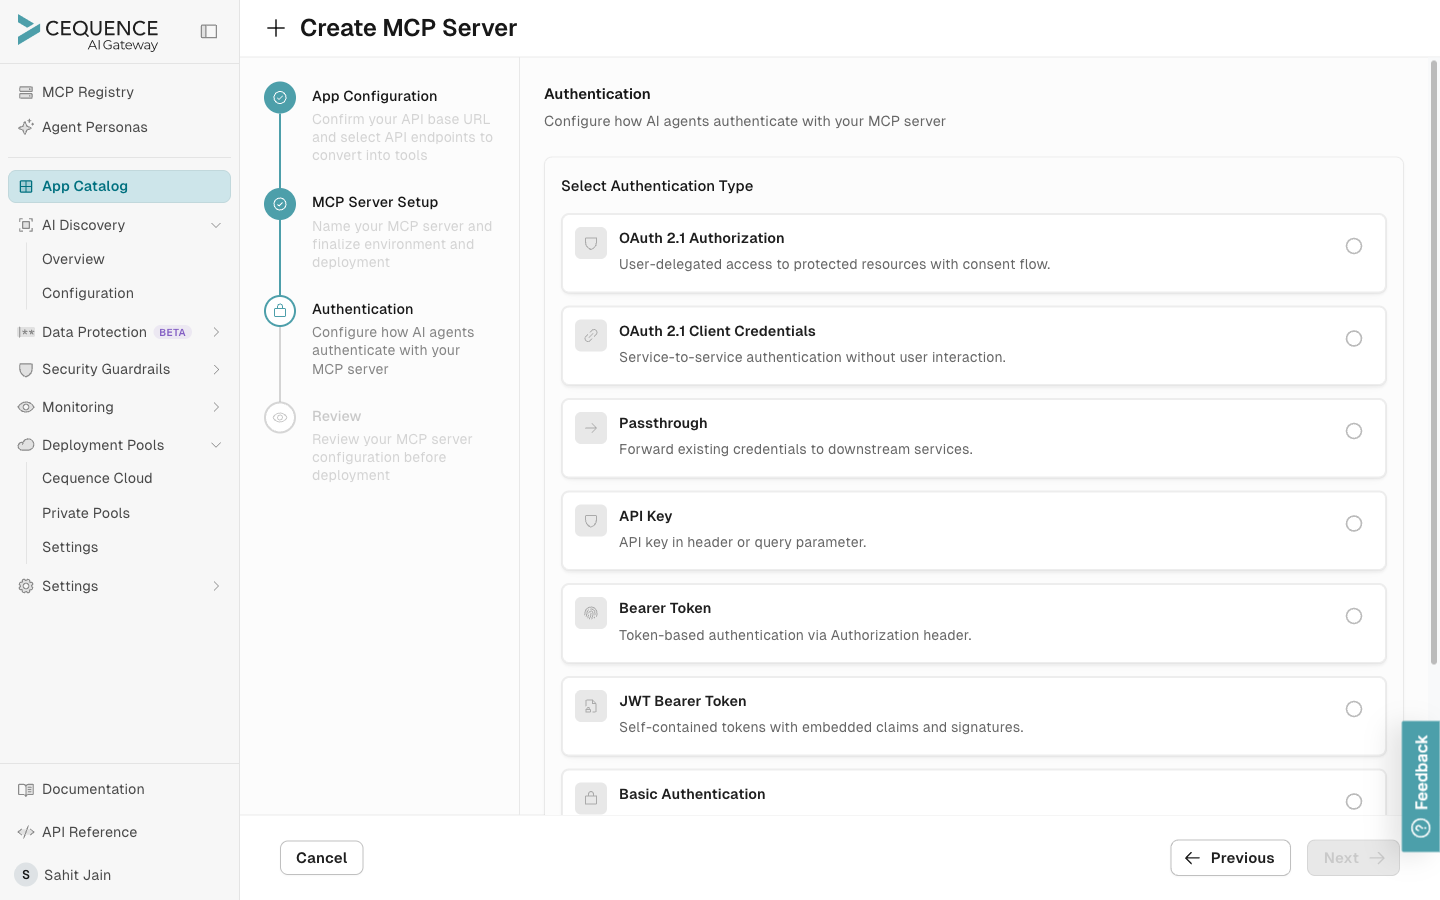
Authentication
Choose how AI agents authenticate with your MCP server:
- Passthrough — forwards existing credentials to the service unchanged. Use this for API keys, Basic Auth, custom headers, or no authentication.
- OAuth 2.1 Authorization — user-delegated access with browser-based login. Needs an Authorization URL, Token URL, Client ID, Client Secret, and optionally scopes.
- OAuth 2.1 Client Credentials — service-to-service access with no user interaction. Needs a Token URL, Client ID, Client Secret, and optionally scopes.
Other options include API Key, Bearer Token, JWT Bearer Token, and Basic Authentication. Select a type, provide any required values, and choose Next.

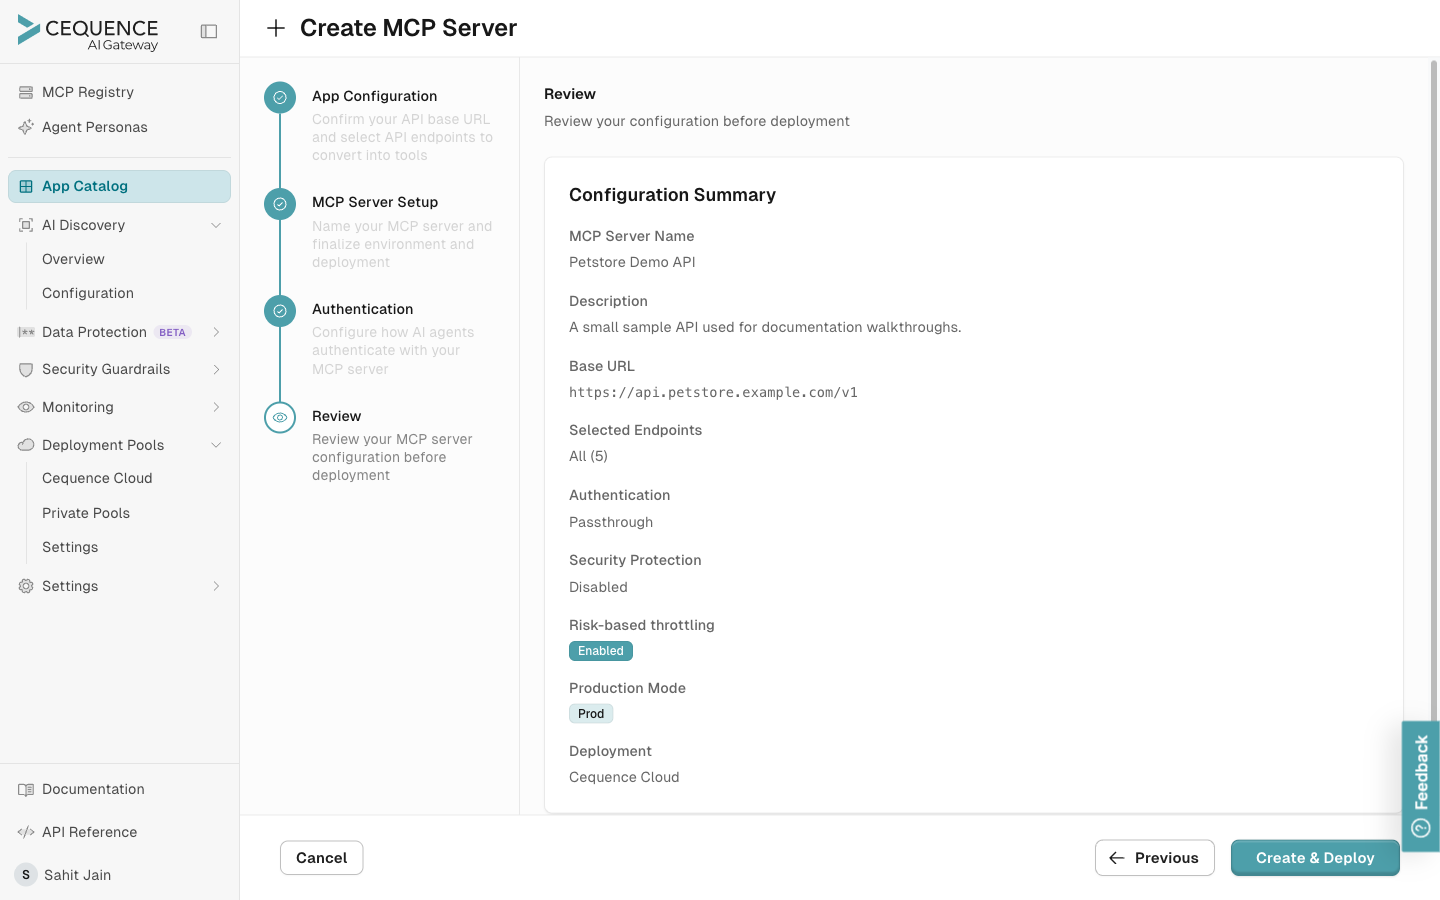
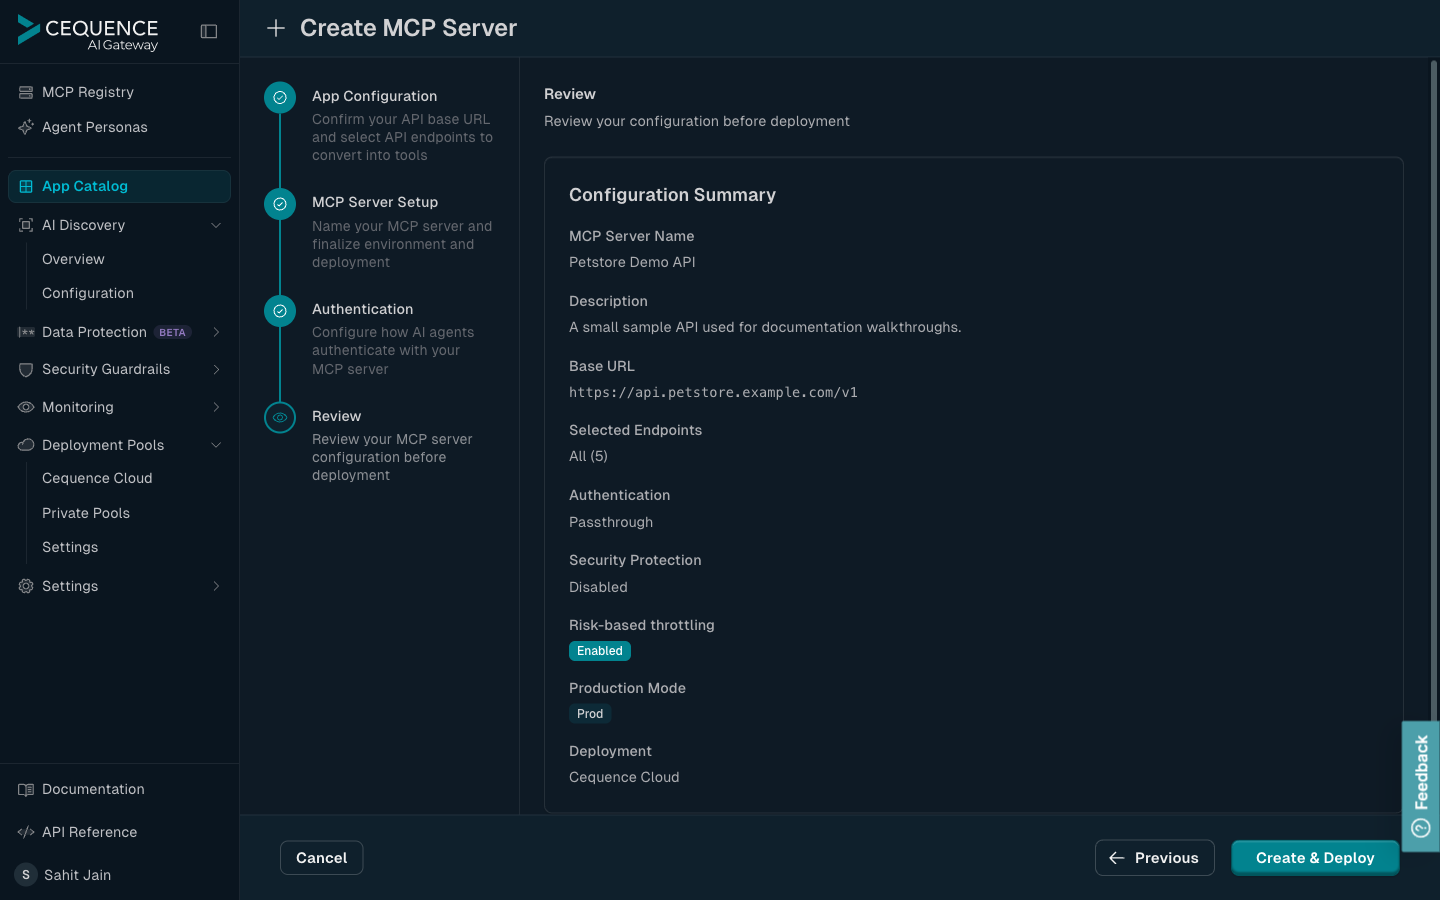
Review
Look over the summary of your MCP server configuration and select Create & Deploy when ready. Deployment takes a few minutes — watch the Dashboard for the Deploying… message to clear.
Adding a Remote MCP Server
If you have an existing MCP server running elsewhere, you can connect it to the AI Gateway to add authentication, monitoring, and security controls.
Step 1: Open the Add Remote MCP Server dialog
From the Cequence AI Gateway, select App Catalog in the sidebar, then select New App in the top right and choose Remote MCP Server. The dialog opens with two ways to add the server:
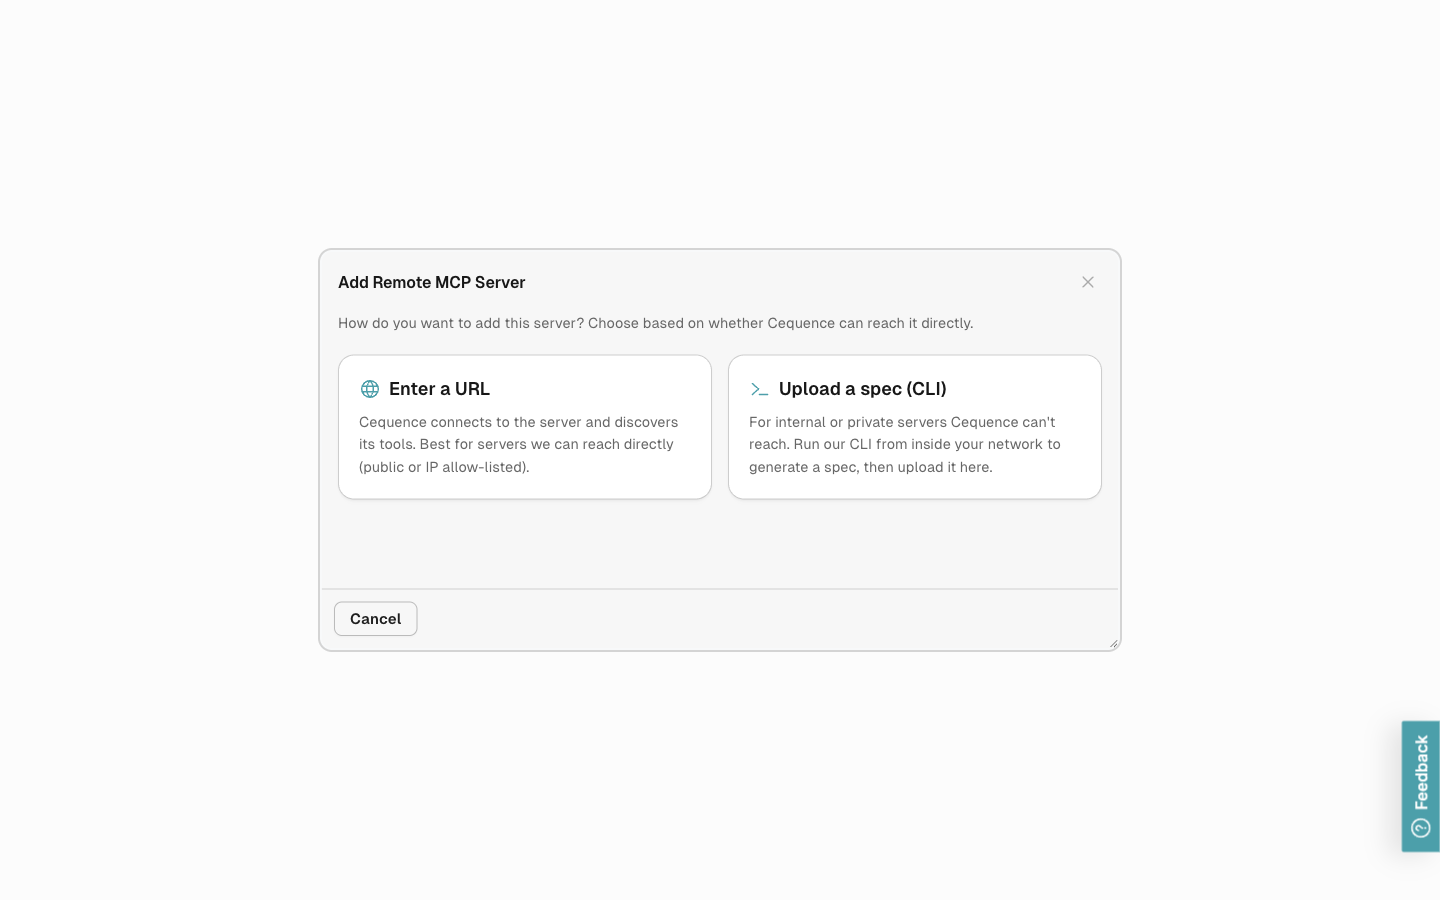
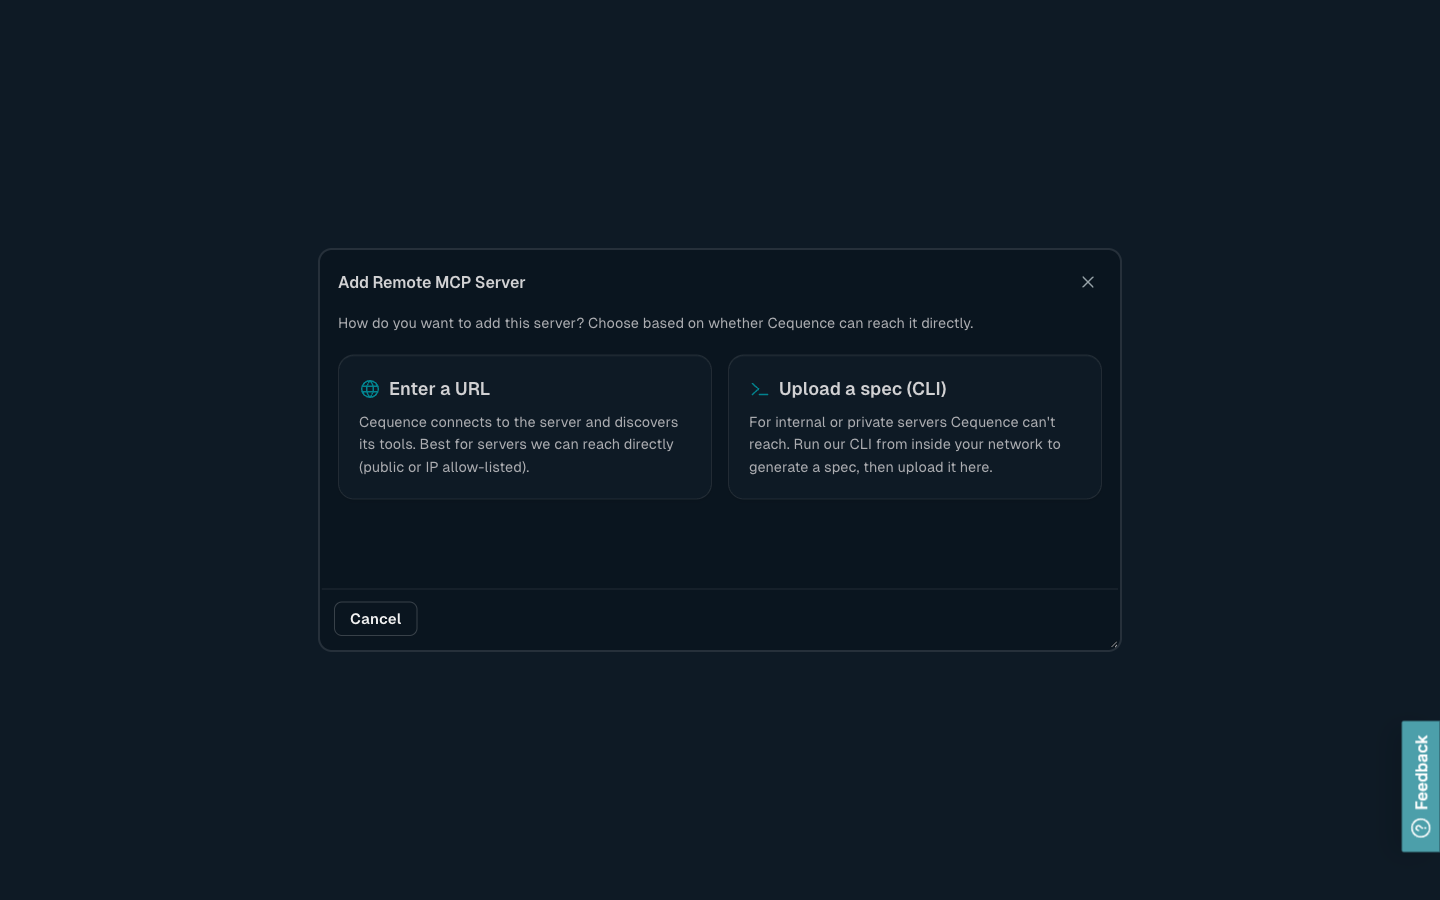
- Enter a URL — Cequence connects to the server and discovers its tools. Best for servers Cequence can reach directly (public, or with the Cequence IP ranges allow-listed). Continue with the steps below.
- Upload a spec (CLI) — For internal or private servers Cequence can't reach. See Onboarding an internally-hosted MCP server below.
Select Enter a URL to continue with the steps below.
Step 2: Configure Server URL
In the Add Remote MCP Server dialog:
- MCP Server URL: Enter the URL of your remote MCP server (for example,
https://example.com/mcp) - Authentication Method: Choose from the dropdown:
- Auto-detect (Recommended): Automatically detects if the server supports OAuth with Dynamic Client Registration (DCR) or requires no authentication
- OAuth 2.1 (Authorization Code): User authorization with manual OAuth endpoints - requires browser-based user login
- OAuth 2.1 (Client Credentials): Service-to-service authentication without user interaction - ideal for machine-to-machine communication
- No Authentication: Server does not require authentication
- Basic Authentication: Username and password
- Bearer Token: Static bearer token
- API Key: Custom header with API key
Step 3: Authentication Configuration
Auto-detect (Recommended)
The system automatically:
- Attempts connection without auth
- If 401/403 received, checks for OAuth support through
.well-known/oauth-authorization-server - Performs Dynamic Client Registration (DCR) if available
- Initiates OAuth flow automatically
No manual configuration required.
OAuth 2.1 (Authorization Code)
For servers requiring user authorization:
Required fields:
- Authorization URL: OAuth authorization endpoint (for example,
https://auth.example.com/oauth/authorize) - Token URL: OAuth token endpoint (for example,
https://auth.example.com/oauth/token) - Client ID: Your OAuth client identifier
- Client Secret: Your OAuth client secret
- Scopes (optional): Space or comma-separated list of OAuth scopes
Flow:
- Select Test Connection
- System opens OAuth provider in new browser window
- You log in and authorize access
- System redirects back and discovers available tools
- Review and create the MCP server
OAuth 2.1 (Client Credentials)
For service-to-service authentication without user interaction:
Required fields:
- Token URL: OAuth token endpoint (for example,
https://auth.example.com/oauth/token) - Client ID: Your OAuth client identifier
- Client Secret: Your OAuth client secret
- Scopes (optional): Comma-separated list of OAuth scopes
Flow:
- Select Test Connection
- System exchanges credentials for access token directly
- No browser redirect - tools are discovered immediately
- Review and create the MCP server
When to use:
- Machine-to-machine authentication
- Automated/scheduled operations
- No user context required
- Background services
Basic Authentication
Enter username and password. Credentials are securely transmitted during discovery.
Bearer Token
Enter a static bearer token. It will be sent as: Authorization: Bearer <token>
API Key
Enter API key and specify the header name (default: X-API-Key).
Custom Headers
For all authentication methods, you can optionally add custom HTTP headers to the connection. This is useful for:
- API versioning headers (for example,
Accept: application/vnd.api+json) - Request tracing headers (for example,
X-Request-ID) - Custom authentication headers required by the remote server
- Debug or feature flags
Select Show Custom Headers to expand the section and add header key-value pairs.
When using OAuth 2.1 (Authorization Code) and manually configuring OAuth with your provider, use this callback URL:
https://connect.aigateway.cequence.ai/oauth/callback
This URL is automatically registered when using Auto-detect with Dynamic Client Registration (DCR).
Step 4: Test Connection
Select Test Connection to discover available tools from the remote MCP server. The system will:
- Connect to the MCP server using your authentication
- Discover all available tools
- Display tool names and descriptions
Step 5: Customize and Create
Optional customization:
- Name: Custom name for the MCP server (defaults to remote server's name)
- Description: Custom description
- Categories: Primary category, app family, and secondary categories for organization
- Labels: Tags for easier searching
Select Next to create the MCP server in your catalog.
Step 6: Create Gateway
After adding the remote MCP server to your catalog, you can create a gateway:
- Select the remote MCP server in the App Catalog
- Select Create MCP Server
- Follow the wizard to configure deployment and authentication for the gateway
Onboarding an internally-hosted MCP server
When you add a server by URL, the Gateway connects to it to discover its tools. If your server runs on a private network the Gateway can't reach directly, that discovery can't run — so the server would be added with no tools. Instead, generate its spec from a machine that can reach it (for example, a laptop or jump host inside your network) and upload that spec.
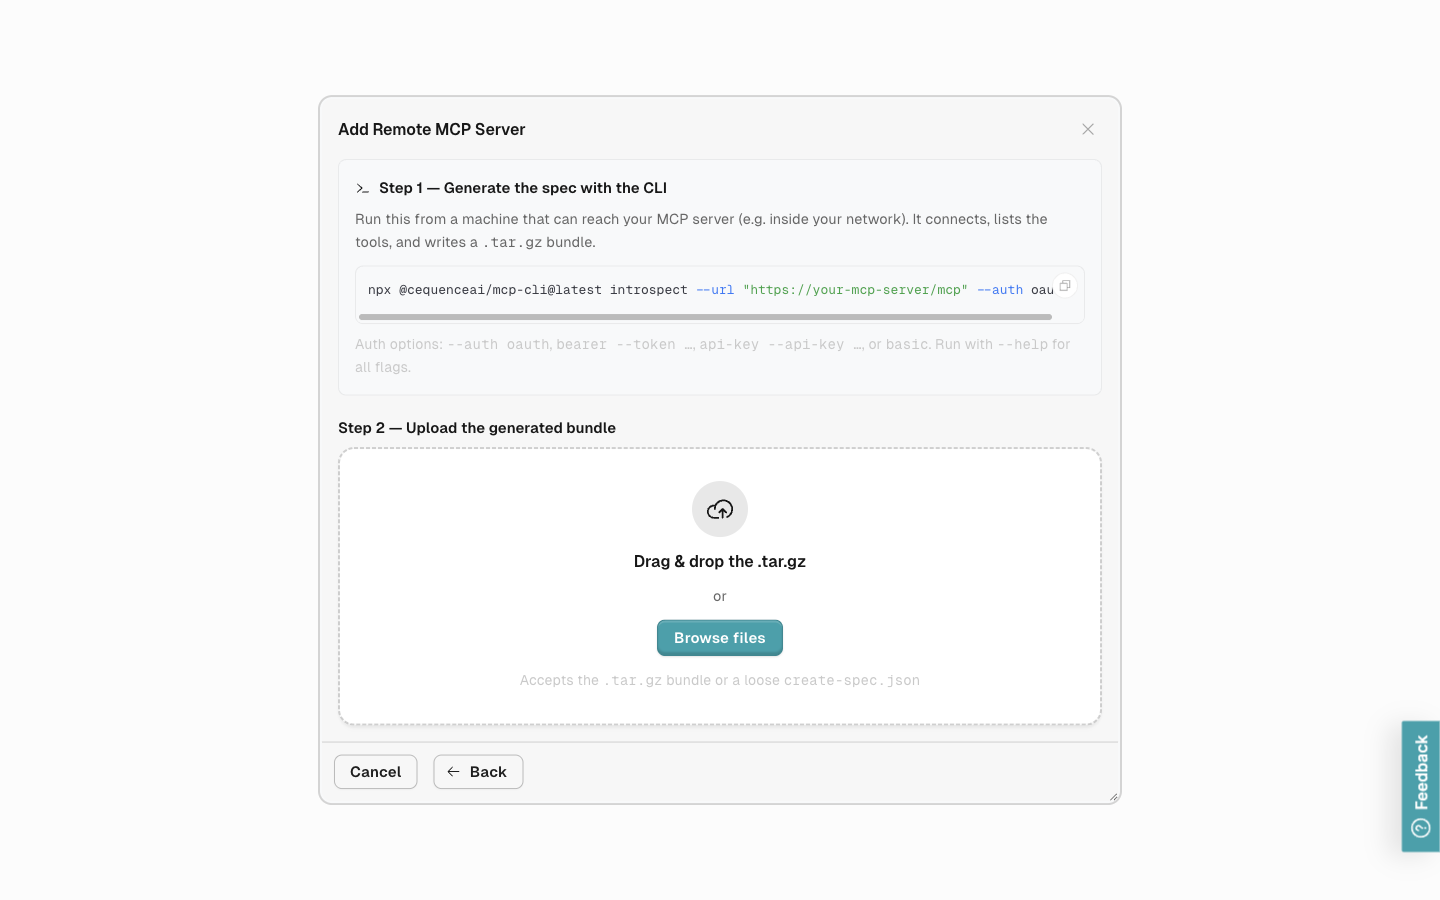
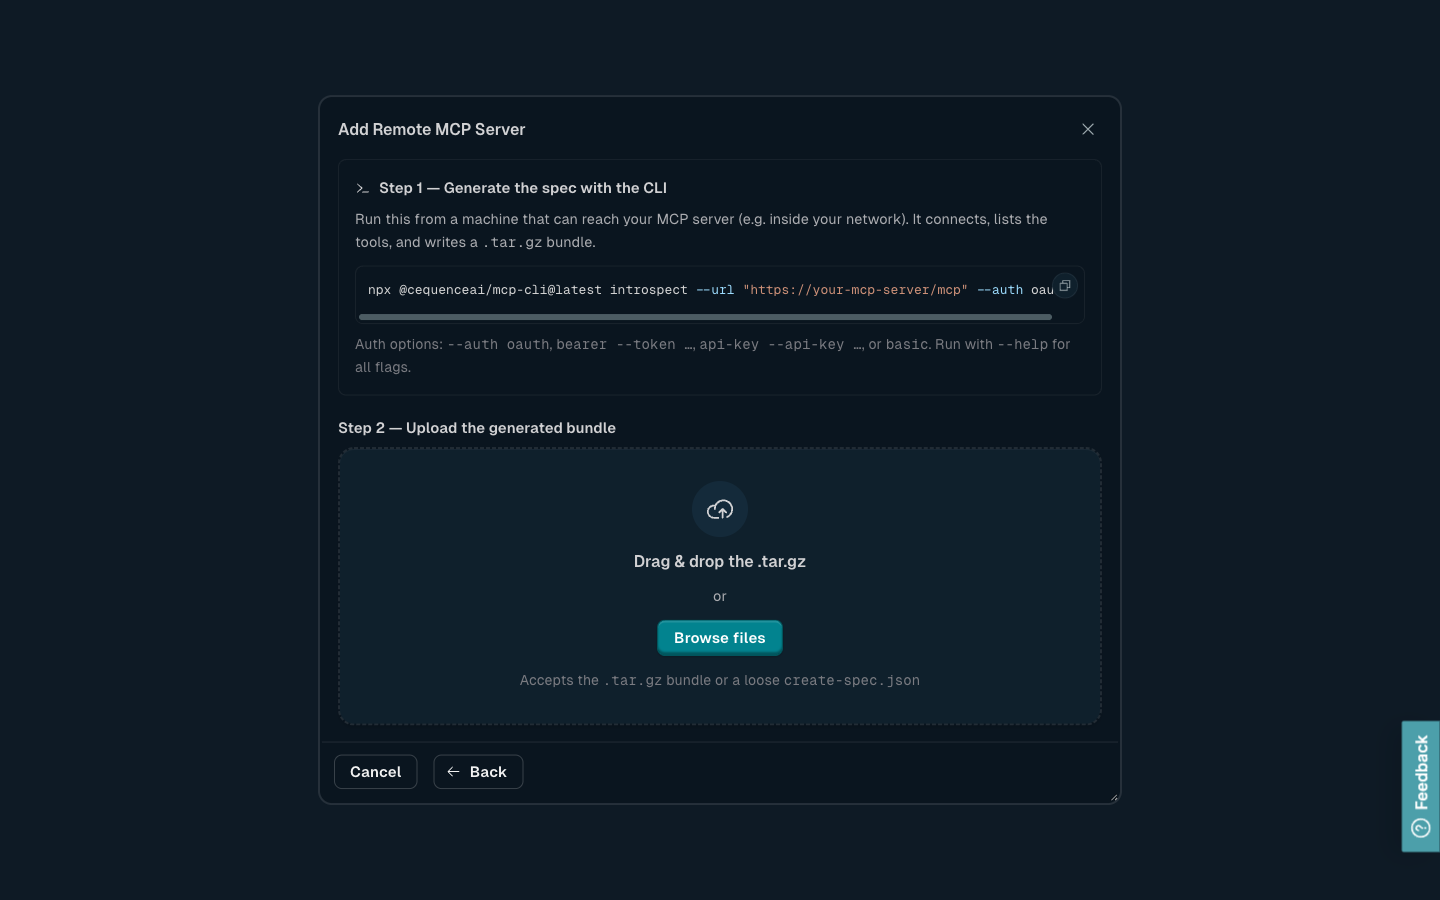
Generate the spec with the CLI
Run the Cequence MCP CLI against your server. It connects, lists the available tools, and writes a spec bundle (<name>.tar.gz):
npx @cequenceai/mcp-cli@latest introspect --url "https://your-mcp-server/mcp" --auth oauth
If your server uses a token or API key instead of OAuth, use a different --auth option — run npx @cequenceai/mcp-cli@latest introspect --help to see them all.
Upload the bundle
In the Add Remote MCP Server dialog, choose Upload a spec (CLI) and drop in (or browse to) the generated .tar.gz:
Review the name and categories, then add it to your catalog. You can now create an MCP server from it like any other (see Step 6 above).
Generating the spec only solves tool discovery. When the MCP server actually runs, the Gateway still needs network access to your server's endpoint — for cloud-hosted gateways, make sure it's reachable (for example, by allow-listing the Cequence IP ranges).
Choose Your Deployment Mode
By default, MCP servers deploy to the Cequence Cloud — no infrastructure setup required. If your organization needs to run workloads on your own infrastructure, you can also deploy to a private pool in your Kubernetes cluster, or use hybrid mode to run in both simultaneously.
| Mode | Best for | Setup needed |
|---|---|---|
| Cloud (default) | Getting started quickly, no infrastructure overhead | None — works out of the box |
| Private | Data residency, network isolation, compliance | Create a pool and deploy the Operator |
| Hybrid | Gradual migration, multi-region, workload separation | Both cloud and private pool configured |
For details on private cloud deployment, see Private Cloud Deployment.
Integrate with your LLM agent
Once your MCP server is deployed and running, go to the Cequence AI Gateway dashboard and select the tile for your server to manage integrations. Select Create Agent Integration to start.
The Cequence AI Gateway supports quick integrations with the following agents.
- Claude AI
- Cursor AI
- Windsurf IDE
Select Create Agent Integration to bring up the Easy Integration Setup pane. Choose the tab for the agent you're integrating with and select the copy icon in the Quick Setup (NPX) tab. The command-line instruction to integrate the MCP server with your AI agent is in your clipboard. Paste the command to a terminal window and run the command. A confirmation message at your terminal indicates that you're ready to test the integration.
Testing the integration
The next time you authenticate to the agent, you will need to provide your authentication credentials if you configured the MCP server to use OAuth 2.1.
Run your AI agent and select the list of tools. This varies based on your agent. Using Claude as an example, the tools control is at the bottom of the text field, next to the Upload a file icon. The tools are enabled by default, but you can disable them by selecting the toggles on the list. To use the tool, refer to the tool in your prompt. For example, if your MCP server provides a tool based on a customer details endpoint, you can use Show me the customer details for user ID 12345 as the prompt, and your AI agent makes the proper request to the customer details endpoint and reports back.
Cequence AI Gateway